![]() DayZ
is a multiplayer post-apocalyptic open-world survival horror and first-person shooter game made by the Czech game development studio Bohemia Interactive. The only objective of the game is to survive, while many maps have their own optional endgame mission, lore, and items. DayZ was originally a mod for the 2009 tactical shooter Arma II designed by Dean Hall in 2012. After major success of the mod, Bohemia hired Dean and started development for the DayZ Standalone in December 2013, but he left a year later. After 5 unproductive years, the DayZ Standalone fully released in December 2018. It remains extremely broken and janky, and will never change. I've compiled this page for my own enjoyment and for my friends, and also because the DayZ Wiki is completely outdated and neglected.
DayZ
is a multiplayer post-apocalyptic open-world survival horror and first-person shooter game made by the Czech game development studio Bohemia Interactive. The only objective of the game is to survive, while many maps have their own optional endgame mission, lore, and items. DayZ was originally a mod for the 2009 tactical shooter Arma II designed by Dean Hall in 2012. After major success of the mod, Bohemia hired Dean and started development for the DayZ Standalone in December 2013, but he left a year later. After 5 unproductive years, the DayZ Standalone fully released in December 2018. It remains extremely broken and janky, and will never change. I've compiled this page for my own enjoyment and for my friends, and also because the DayZ Wiki is completely outdated and neglected.
I have met many different people, dying with them, from them, or never knowing their fate. Lots of people will accept you as a teammate purely to increase their chances of survival, keeping you alive and healthy to have their back. Interaction is a surprise at any time, and you have no true way of knowing anyone's intentions.
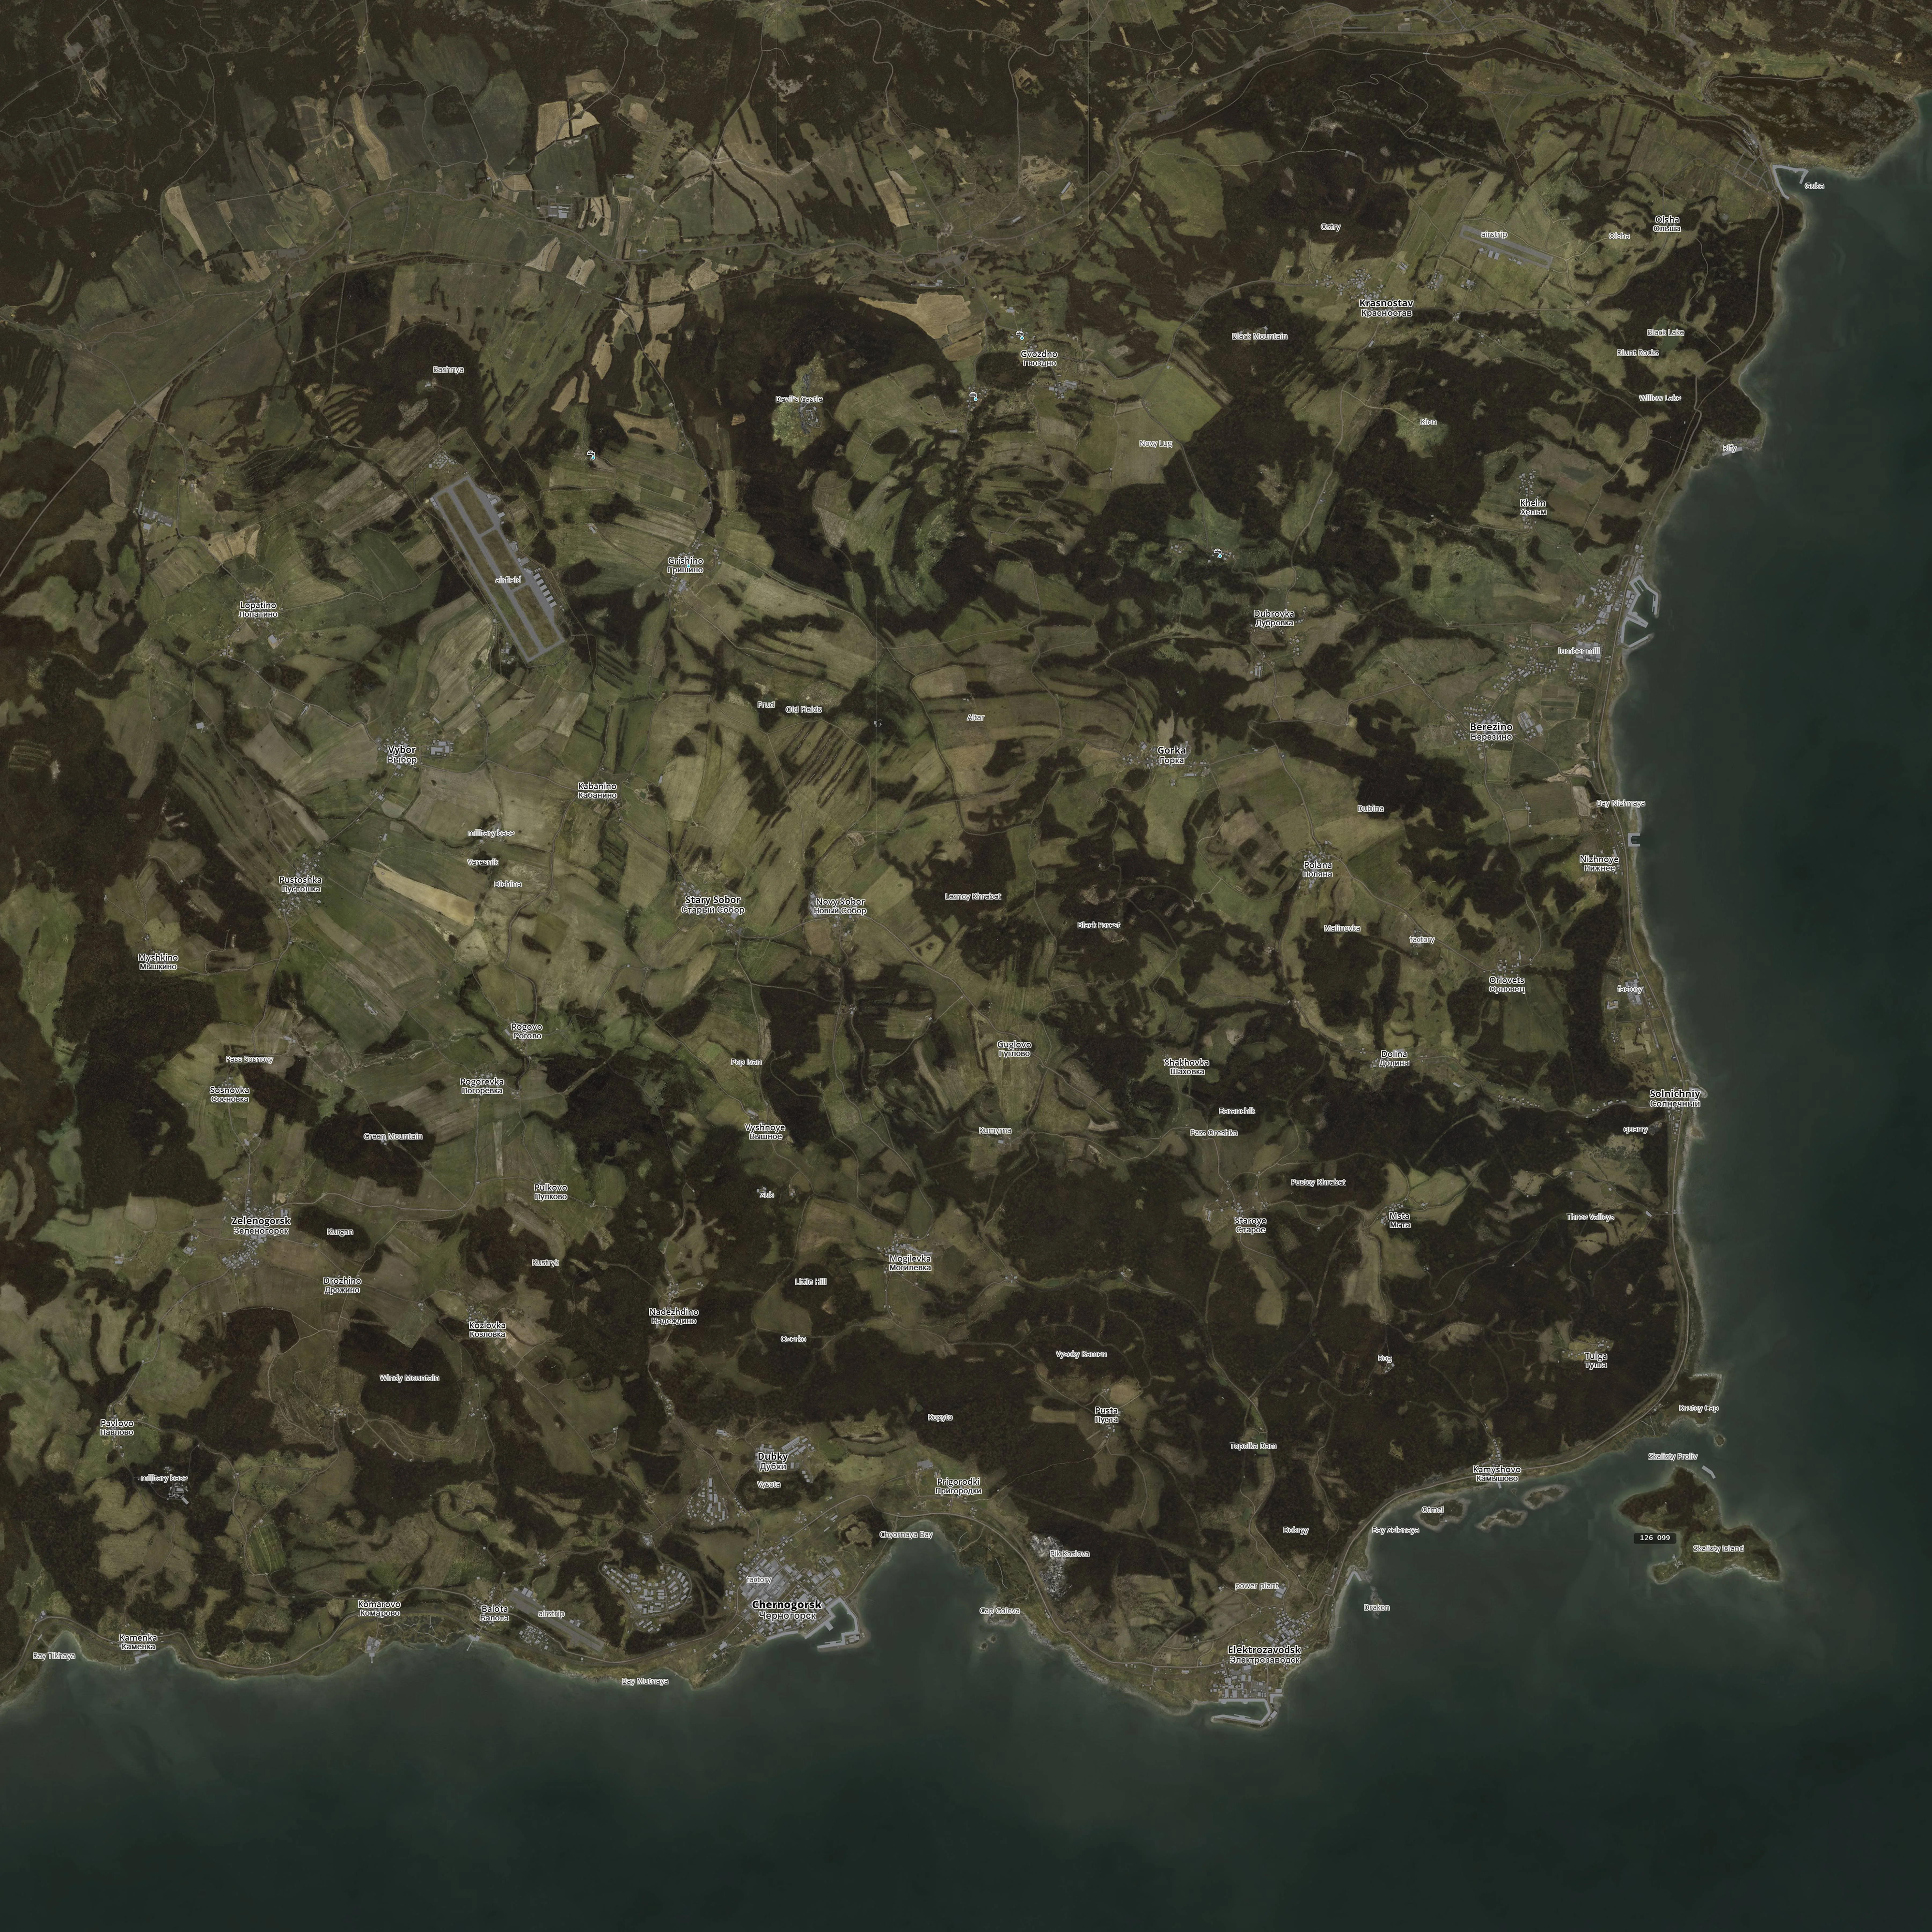
There are 3 official maps. The first 2 are originally from Arma II: Chernarus (irl: Ústí nad Labem, CZ) and Livonia (irl: Chřiby, CZ). The third is the paid DLC Sakhal, which is directly modelled on the volcanic jungle map Tanoa (irl: Fiji) from Arma III. Sakhal looks exactly like Tanoa but set in the bitterly cold far east of Russia. A second paid DLC map is coming out in 2026 called Nasdara, and it is not based off of a pre-existing map or place in real life.
There are also a ton of mods and modded maps, but the most notable one is Namalsk. This mod is older than DayZ itself, released in 2008 (4 years prior). Points of interest are few and far between and survivors are more desperate due to the scarcity of items to keep them alive. Reoccuring psionic EVR storms and blinding blizzards force players into houses to survive the anomaly's blow out and the harsh climate alike. I've compiled a second webpage dedicated to my time playing Namalsk. Please note I've completely moved all mention of explosive traps to that page as it's a much bigger threat on smaller maps with denser player population.


 * Before You Play
Prologue: This webpage is meant to be a field guide for DayZ, and is made with love.
No AI, no info sourced from comment threads, and no random guesswork disguised as truth. The DayZ wiki was used lots for triple checking and exact statistics, but as 90% of information is missing, outdated, or misleading, nothing is directly copy pasted except for data statistics on items.
I plan to continue updating it until I stop playing the game, but I have a feeling I have a few good years in front of me. This game is a joy to play, and absolutely fulfills me in some way by interacting with strangers across the world late at night.
Always remember: this game is punishing to every single player. You can make every single good decision in your character’s life and still have it taken away in an instant by someone else. If you’re struggling to live by yourself due to loot or food scarcity: start robbing or killing players, start eating people. There are an infinite amount of ways a life can go: do what you have to, and do what you want to. Don’t let other players completely rule how you play.
* The most important thing I can say here about DayZ is that absolute knowledge is NOT needed to play for the first time, but it can be helpful. It took me at least 200 hours to feel confident in surviving on my own. Learning the game painfully, and wondering about hoaxes and being wrong about game functions makes the game great starting out.
It's awesome. Don't derive yourself from being a helpless noob, players will simply take you under their wing if you let them know you're new. They may also shoot you on the spot. This is just the equivalent of a wiki of my own personal knowledge. Lots of my information comes from watching creators who have tens of thousands of hours in this game. If I'm wrong about anything, which I will be, email my sorry ass and let me know.
* This chapter I talk about how to navigate the launcher and finding a server to play on, server restarts and how to fix data mismatch errors, HUD and User Interface, your inventory, how to use ingame voice chat (VOIP), and all of the ingame keybinds. Chapters after this will mention to read this initial explanation for context on the workings of the HUD, UI, and keybinds, so if you want context, read this! If you aren't planning to play and just want to know about the general gameplay and flow of necessities that a life on DayZ entails, feel free to skip the prologue. Please keep in mind I've never played on console and barely ever on Bohemia's official servers so none of this is adapted to that. Mods and modded maps like Namalsk are not available for any console version of DayZ.
Keep in mind DayZ's regular price is $50. If you're wanting to play, wait for it to go on on sale on Steam for $22. It gets discounted frequently throughout the year. I talk about this and Sakhal (DLC) at the very end of this chapter.
* Player Names, Choosing a Model - In the DayZ Launcher, select "Parameters" and then "Profile name" to change your ingame name. Other players won't be able to see it unless there's a party system mod, or you talk in the ingame textchat. Admins will be able to see your name always - "Survivor" is the default name for someone who hasn't changed their in game name. If you want to play as a specific character model, you can only change it by going into the game. Press the big red PLAY button in the bottom left to open the game without loading into a server. Find the "Customize Character" button on the lower right-hand HUD (you might have to use the arrow buttons to flip through until it's there) and then press Save once you're finished. Lots of people use the "Random" spawn button to load in as a different model each life. But you deserve that choice! Use the "Custom" spawn button when you load into your server to use your chosen model.
* Choosing a Server - Now, in the Launcher, go to "Servers". Your two options are the Official tab and the Community tab. The official tab is official Bohemia servers for vanilla Cherno/Livonia/Sakhal. There is a problem with cheaters on Official servers, especially full servers. You can only unlock Steam achievements on the official servers, but besides this, there's not much of a point to choose them over community servers. Community servers are modded servers on any map of any kind, hosted and paid for by a community member. There's an infinite amount of mix and match with maps and mods on DayZ, so choosing a server for you can take a bit of looking.
Please keep in mind some servers will route you to other servers, trying to direct traffic into different servers than the original title entails. This is uncommon but can happen. Check what server you're connected to by pressing ESC to view the menu.
* Server Restarts - Every few hours, your server will restart. It's different depending on how the server owner sets the schedule, but the most common times are 12:00, 4:00 or 12:30, 4:30, etc. The server will periodically send out a few restart warnings before you'll be kicked from the server.
If you are in a vehicle, you will spawn back in outside of the vehicle. If you're driving a car/humvee, boat, or helicopter, prepare to stop or land it for the restart once you receive the first warning message in chat. You have a large chance of losing your vehicle or even your life if you're in the air when you are kicked for the restart.
Objects on the ground will not disappear. Any dead bodies will disappear along with the loot inside of them. This makes combat near a server restart very risky, though dragging clothing off a body onto the ground will save the loot from disappearing.
* DZSA - First off, the DayZ Launcher is extremely slow, but enough for a solo player to find a server. If you're looking for a server by name - or barely any servers are loading - the DZSA Launcher is an external application that does a way better and faster job of finding specific servers. You can join directly into the servers through this as well, it's not just a search engine. The only downside is the lack of the ability to copy and paste server names. The default launcher lets you do this, so I tend to use the default launcher to find a server for my group, and they use DZSA to find it faster.
* Notes on Ping & Mods - Look for servers that have between 20 to 150ish ping for a normal experience. It's definitely possible to play on EU servers from a NA standpoint, with a little lag, but if your ping or internet is particularly shitty, lag is a common way to go out due to DayZ's horrible unescapable packet loss. You won't be able to move items in your inventory, or block yourself from zombies if you're lagging horribly. Around 230+ ping is where this starts to threaten your life. The server will kick you automatically if you go above 300 ping. Your character gets killed when you log out of the server while unconscious or tied up or even if you get kicked while logging out, so this can mean unavoidable and immediate death. Please keep this in mind while choosing a server.
Please also check out the modlist of a community server intensely before putting time into the server. The DayZ Expansion mod comes with AI. These AI kill on sight, and are freakishly good at knowing where you are. They will hide in corners and mag dump you. Please also watch out for modded creatures, especially on PVE or PvPvE servers, and extra-especially on Namalsk. These mods are actually loads of fun if you enjoy screaming and running, but mutants are extremely hard to kill to the point where it's better to trap them in a shed than actually deal with them. Custom gun pack mods will fill the loot table with a bunch of useless modded ammo and unusable mounts/etc. If you're overwhelmed by all the mods, just search for vanilla or vanilla plus servers and you'll find your perfect match of community servers without a shit load of mods.
Another thing to keep in mind while browsing a server to play on - servers can be password protected despite showing in the server list and will be unplayable without the code.
* Server Keywords: 1PP is first person only, 3PP is third and first person. PVP is Player v player. PVE is Player v Environment. PvPvE is a mix of both.
Mods I recommend when learning the game: SchanaModParty, SchanaModGlobalChat, VanillaPlusPlusMap, Just Gasmasks, Earplugs.
Mods I do NOT recommend for your first time: DayZ Expansion's AI, dbo creatures, Ajs Creatures, TerjeMedicine/TerjeRadiation/TerjeSkills, ZenSleep
Mods I recommend for fun: Windstride clothing, Dogs, Horses, AirRaids, Cannabis, Advanced Weapon Scopes, sGunplay.
* Data Mismatch Errors - Sometimes, getting into servers will feel impossible. If you encounter a data mismatch, look in the error code for the specific mod's name(s) and go to the Steam workshop and remove and redownload them. If you get the latency kick for taking too long to load in, just keep trying to load in. If you're out of options go to DayZ's game page in your Steam library and look for the cogwheel in the far right corner of the main option bar. The main option bar is the one with the logo, time played, achievements and etc. Click on it and press "Properties..." and click Installed Files on the nav bar. Click "Verify integrity of game files" and wait about 5 mins for the game to verify itself. I usually do this in combination of redownloading Steam workshop mods if I can't get a data mismatch error to fix itself. You might have to do all of these things multiple times for it to work. When in doubt, just look on Reddit, people love complaining there and others love to be smart and answer them.
Keep in mind, when major updates come out each and every server owner has to update the server themself, along with mods. Immediately after major updates you're going to have to find servers to play on that are updated. You won't even have the option to connect to outdated servers, so any servers that have players on them are updated.
* HUD + Inventory Basics - Load in, and take a look around your screen - your character's stats are in the bottom right. They're all very straightforward so you can figure it out. You'll find that temporary indicators will appear to the left of these cores, like the sickness symbol to let you know you've contracted something, the full stomach icon which lets you know if you eat/drink anymore you'll vomit. Other icons include leg pain from falling from heights (multiple stages - if you keep on damaging your legs while seeing this icon you will break your leg) and the fracture icon, which can be accumulated like I said, but it's much more common to break your leg from direct damage like a beartrap, gunshot, landmine, etc.
Your stamina, noise indicator and stance are on the very bottom left of your screen. As you pick up items it will accumulate to losing your maximum stamina, greying out your bar slowly. Be aware you cannot jump certain heights when you have extremely low stamina, including jumping in general if you have barely anything left. Your noise indicator will change as you get heavier as well, making zombies hear you from closer, but it's not a big change, sprint-crouching (and crouch-walking at around ~10 meters) will always be a pretty good option for stealth killing and avoiding zombies.
First, press tab to open the vicinity and your inventory. Your inventory is something you'll have to get used to with time because it can be finicky - sometimes items you pick up will automatically go into containers in your inventory. You can also click the arrows to open and close the dropdown to show everything in a clothing item's inventory space. Keep this in mind if an item you're looking for goes missing! Most of the time, it's within an item you're not checking, or you've closed out of the view of the clothing item you're looking in. The vicinity is everything you can physically see, so the best way to use it is by tapping tab to quickly check an area you're looking at, tapping it to close it and looking somewhere else and tap it and so on.
With your inventory open, drag items found in the vicinity to your hand slot in the center to equip it, and drag or double click items to put it in your inventory. Specific items can be combined with others to craft items. There is no ingame way of seeing all of the crafting combinations, so it's something you'll have to look up and memorize over time. Hold F on an item you're looking at to automatically put it into your hands. Drag large melees (fireaxes, baseball bats, pipes, sledgehammers, etc.) or guns to either of your shoulder slots to keep it on your back. Drag clothing items to one of the matching slots (at first, you'll have to learn the hard way by brute forcing items to your slots to see what goes where - some clothing like shemaghs and bandanas can be worn in different ways - on your head, face, etc) at the top of your inventory. Double click items in your inventory to equip them, and CTRL + left click to quick-drop items into the vicinity.
* Hotkeys - In your inventory, you can either drag an item to your hotkeys at the bottom, or hold down a number key on your keyboard to assign that item a hotkey. By pressing the ` key you can toggle the visibility of your hotkeys. By holding the ` key, your stats, stamina, stance, and noise indicator will toggle. As you learn the game, you'll feel more familiar with toggling both of these to your liking. Personally, I permanently keep my hotkeys off, because I've kept the same mental system of what type of item is which number on my hotkeys. I highly recommend this, it can save your life! Here's my system as a suggestion/example: I always use 1 as my zombie melee. 2 is bandages/rags, 3 is my handgun, 4 is my rifle. From 5-9, it depends on every life and what I've gotten. As a rule of thumb, if you have a weapon like a melee or a gun, if it's not hotkeyed you will barely ever use it. My zombie melee is specifically an item I want to solely use to melee. It won't be my only blade, please use your blades wisely as cutting up rags, opening cans, and gathering bark are absolute life-savers.
* Important Keybinds
WASD to move
Space to jump, vault, and climb ontop of things
Hold middle mouse wheel to zoom in
Press middle mouse wheel while hovering an item in your inventory/vicinity to open a zoomed view of it
Hold Q to lean left
Hold E to lean right
Double tap Q or E while standing with your hands raised (hold right click) to strafe in that direction
Press shift to sprint
Press C to crouch/uncrouch
Hold C to go prone
While prone, holding right click and dragging your mouse will let you turn on your back or stomach
When prone and on your back, pressing right click + left click will make you kick. This always stuns opponents backwards, but does no damage. This is the only way to knock someone out of the suicide action without doing damage.
Hold left CTRL to slow walk
Hold right click to raise your hands
Raise your hands and press left click to light attack. Press shift during to heavy attack.
Raise your hands and walk backwards to block for melee. You take no damage from light attacks, but full damage from heavy attacks
If you're playing on a server that has 3rd person, press V to switch in and out of it.
Hold left alt for freelook
Double-tap left alt to lock free look in place
Press ` to hide your hotkeys, and press it again to bring them back.
Hold down ` to hide your entire HUD, and hold it again to bring it back.
Note: There is a bug ingame with your HUD becoming permanently off. There is another one with the bleeding icon permanently staying. Relog to fix both of these.
Scroll through item crafting/interactions using the mouse wheel
If you have a map in your inventory, or the server has a map mod, press M to open it.
If you have a headlamp on your head with a working 9v battery, press L to turn it on.
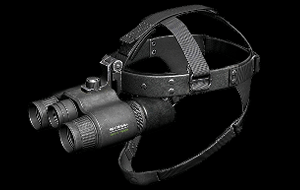
If you have NVGs, hold L to flip them over your eyes. If they don't have a battery, it won't do anything. But you'll look sick as fuck tbh.
Tap G to change your stance into throwing the item in your hand. The longer you charge your throw by holding left click, the farther the item will go. Release left click to throw, or press anything else to cancel.
Hold G to drop the item in your hand onto the ground where you're standing.
When it comes to throwing grenades, keep in mind you can't prime a grenade in this game anymore (holding it in your hand unpinned to shorten the detonation time before throwing). Please note that the center of your screen/crosshair is NOT a good indicator for where your item will go to, it's off-center. Throwing items accurately is absolutely a skill you will understand with practice only. Get to throwing!
* Emotes
To emote, press one of the Function buttons. Press the same button to stop emoting. Some emotes are slightly longer than others, and you can't animation cancel. There are a TON of emotes in this game and I highly recommend assigning your own emotes to the function keys. Like my favorite - called Silent. Your character will hold a finger to their lips as if they're going shhhh...
Hold . to open the radial emote wheel and click on an emote to confirm
F1 is to put your hand up in a greeting
F2 is to SOS wave
F3 is to make a heart with your hands
F4 is to flip someone off
F5 is to surrender. you can't access your inventory with this one
F6 is to do a chef's kiss
F7 is to point in the direction you are looking in
F8 is to taunt with your elbow
F9 is thumbs up
F10 is to tauntingly slit your throat with your thumb
F11 is to commit suicide. You'll need a sharp tool of any kind or a loaded gun to do this. It's not a taunt like F10. To get out of this pose you can press any other button to cancel at any time. To confirm, press left click after your character has finished the animation of kneeling on the ground. A similar emote that's actually an action is the vomit option. This will empty your character's stomach, so I don't recommend binding this.. unless you're a comedic genius
* VOIP - Hold caps lock to talk in-game. Double tap it for constant pickup instead of push to talk.
Use the up and down arrow keys to go through the three speaking volumes.
One is whisper, two is normal, and three is shouting. Though it's labelled like this, you won't be quieter on whisper or louder on shout. It's only distances.
Roughly the distances are ~7m, 25m, 45m.
Players can hear you speak clearly in these ranges no matter if they're above or below you.
Gasmasks and biker helmets will muffle your speech incredibly. You won't be understood easily but the voice effect is very entertaining.
* For gun and vehicle HUD & keybinds check them out in their respective categories.
* You'll have to be loaded into a server to see/change keybinds and other game settings not found in the launcher.
* Notes on Items - DayZ is an extremely janky game in many different aspects. One of the most annoying and unsalvageable ones are items not dropping on the floor correctly, teleporting upwards, downwards, into nearby walls and the above roof, etc. If you put an item down and it disappears, before accepting that it's gone to the void, check interior and exterior walls, and don't forget to look up and under nearby objects. Most of the time, stuff can be salvaged by searching weird places and finding the right angle on the item for the option to hold F to put it into your hands. It happens to the best of us, so keep it in mind to hold your items close, and sometimes when this happens there's nothing you can do if you can't find it and you will have to leave it behind. This will happen most commonly when you directly drag an item from the vicinity into a clothing slot, making the item you're already wearing in that slot bug out when it is forced to exit your inventory. Instead of swapping things like that, drag the item you're wearing into your hand, and then hold left ctrl while clicking it to manually drop it to the floor. Drag the item you want to try on into your empty clothing slot. It's hard to remember but after losing multiple items you will start to develop the sense for doing this. Good luck, happy hunting.
* Is it worth buying full price? (It's $50 USD) - The short answer is no. It goes on sale multiple times a year on Steam for 22 bucks.
The long answer is, three years ago it was on sale for $22 and I was thinking it was still a high price, despite being an entertaining game. DayZ is made entirely up of assets from Arma. Arma 2 at the moment runs for $12, and on sale for $3. Recently, they upped DayZ's price from 45 to 50 to include the paid DLC map Livonia (which was going for 30 dollars JUST for Livonia!) and the soundtrack. Which does not even play ingame.
Despite being modelled from Arma, it runs on a different engine, which makes it feel very different. You'd expect it to be optimized but despite this it has relentlessly common bugs that have been in the game unchanged for several years, which can very likely end your life prematurely or at the very least piss you off. Not to mention the blatant cheaters on official servers, the lethal lag you can experience, deadly physics, broken hitboxes, the notorious "hand bug" and etcetera.
These will have to be something you have to accept as part of the game as it's something Bohemia clearly doesn't plan to fix any time soon. Don't worry though, at least we have another $20 map to buy soon on top of their $50 game.
* Is buying the Sakhal DLC worth it? (It's 27$ USD) - No.
I bought it on release because I was very excited to have an official winter map, and because the news leading up to it were map-specific features and lore-type secrets hinted within the new caves.
All Sakhal turned out to have end-game wise was a bunker quest exactly like Livonia's, but more annoying. The scientist's briefcase basically needed to get to the bunker is always a pain in the ass to find, being essentially invisible to find from more than 10m away, even after finding it multiple times already. Always at least an hour running around the same giant 1km circle wide area of the volcano, ruining my shoes and starving me, and after you run all the way south to the bunker, there is no lore to explore, no secrets, and increasingly repetitive spawn-town experiences from there on out as a freshie as there's nothing else to do.
At that point, people start hoarding bunker loot at their bases, driving their car there back and forth from their island base. There's no reason to ever swim out to the islands of Sakhal besides to base (which is gross), and yeah there's a shipwreck at the very far south end of the map on an island but the loot is not easy to get and is not nearly comparable to bunker loot.
The only new features they added for a 30 dollar DLC? A lethal Sakhal-specific disease: heavy metal poisoning, but eating snow was never safe either way. And across the entire game predator meat becomes disease inducing only because they added 2 new types of prey. Months after its initial release, the like 3 geysers on Sakhal kill you on impact if you're there exactly when they erupt every few hours.
Awesome. It's a hardcore winter map that is incredibly underwhelming and much easier to survive on compared to the free, incredibly popular and known winter map of DayZ... Namalsk. Without anything at all that made Namalsk an amazingly developed map, as in comparison it has zero end-game past the incredibly repetitive bunker. Cool. I'm so glad I bought Snowy Tanowy at the low price of $30. At least they added winter NBC gear... that can't even be practically used because there is no permanent or dynamic toxic zones at all on Sakhal. Please leave now. im upset.
back to top
 I. Basics and Zombies
* In this chapter, I go over what to do when you spawn in, understanding zombie combat and how to stealth kill them, where exactly to look for loot like clothing, food, water, tools, and medical supplies, as well as what to pick up and what to toss.
* Spawn Checklist - Make sure to read the prologue if you're looking to play for the first time. Spawning in, you’ll always face north. On Chernarus, there are 2 sides of the coast you can spawn on, so you'll only be able to tell which coast you're on depending on town signs. On the southern coast, by putting the ocean to your right you’re heading east. By your left, west. On the eastern coast, putting the ocean to your right means you're heading north, and to your left means south. Pulling up the map on iZurvive will be the best way to learn. Search for town signs to find out where you are, they're located on the main road on either side of the town. Go into towns and into houses to find food, water (you can find soda - water found in containers has a chance to make you sick, so water pumps are the only reliable source of replenishable water), clothing, tools, and guns. Police stations have guns, ammo, mags, and armor such as press vests. Hospitals, medical tents and random civilian buildings have multivitamin pills.
* Basic Zombie Combat - While you're trying to search your first town, zombies will be everywhere in and around the town. Being in their general view will aggro them, and they can also hear you (unless crounched) in about a 20m range, making them scream and run towards you. The absolute first thing to know is blocking while facing a zombie's attack will 100% prevent any health damage. Player's light attacks can also be blocked, but heavy attacks from a player cannot be blocked. Both zombie and light player attacks will only be blocked if you're facing where the attack is directed! To block, you have to have your hands raised and walk backwards with S. To raise your hands, hold right click.
Zombies always attack in patterns of two, with a second of gracetime between them. These two attacks do the same damage and it gives you the upper hand if you block for both of them, then attack them by left clicking with your hands still raised (right click for hands raised + left click to attack). This is called a light attack, and it gives the zombie time to get in another hit because it doesn't make them stumble back. Holding shift during right + left clicking will turn this attack into a heavy attack, the heavy attack stumbles the zombie backwards and you can easily stunlock them by heavy attacking, walking forward to fill the gap they've stumbled back on, and heavy attacking again, moving forward again, and so on. Using this stunlock technique combined with blocking every time the zombie attacks you means you'll be a zombie killing master.
To stealth kill a zombie, you'll need a small to medium sized knife - I'm pretty sure machetes work as well. Don't approach the zombie from the front or let it see or hear you by walking normally or crouch-sprinting too near. Crouch down and go towards them from directly behind, crouch-sprinting when a good distance away (more than 8-10m) and crouch-walk when around less than 8 meters from them. When directly behind the zombie, hold right click then tap left click as if you're light attacking it. Do not press shift. Once again, you'll raise your hands and stand back up by holding right click, then you'll snap into the animation when you press left click. During blizzards and rainstorms, zombies become more oblivious to sound. You can eliminate a ton of zombies as long as none of them are facing you. Use cover and sneak around the best you can for the best results. You cannot stealth kill anything else but zombies.
There are a few different types of zombies in DayZ. It's not extremely noticeable, but once you can tell the types apart it will help you understand how zombies work much more. Some zombies are determined by the area they spawn in, such as NBC zombies. Captain zombies, however, have an ability to round up groups of zombies near them with their loud scream. Keep in mind you won't get an item drop from a zombie every time, and on Namalsk the chance for zombies to drop food is even more rare.
* "Regional" Zombies - Civilian zombies will drop food and drinks and carry bags on their backs, military zombies drop ammo, NBC zombies drop gasmask filters, etc. There are also times of the year where you'll find event zombies: without revealing much, keep an eye out for Mummies and Santa.
* Screamer/Captain Zombies - These zombies are a type of military personnel described apart by a captain's hat and a pistol holster. When these zombies scream, they have a special ability to attract all zombies within their immediate radius. They are to be entirely avoided when possible, especially when you're hurt and can't run away from a swarm.
An extra note - DayZ has limb hitboxes meaning if you have a sharp or blunt object, aiming upwards for the zombie's head or neck has a chance to crit them. Aiming high while attacking a zombie is the way to go, and this works against other players as well.
* Looting - Chernarus has a ton of coastal towns up and down the coastline. Going into houses and looking on surfaces and the floor, you should find some food and clothing. Starting out, visiting one or two of these towns will hopefully get you a gun and some food. Water pumps are extremely hard to find starting out, so finding a town sign and finding it on iZurvive is genuinely going to save your life. Thirst and hunger onsets as you sprint long distances. It's best not to "conserve" your food by eating half and saving half for later - if you're yellow or red hunger, slam any food you have. It gives you back way more energy and health regen this way.
* Important Items - Some common items are truly life saving, but without the knowledge, you'll pass up on them.
Always wear armor you find such as any helmet (of any kind), press vests, ballistic vests, stab vests, chainmail, and plate carriers when you see them, even though other vests offer more space. They will save your life if you take a round to the chest, and wearing a helmet reduces your shock by a little and allows you to (potentially) survive a round to the head from a low caliber pistol.
Always pick up any type of small or large sharp blades you can find, including screwdrivers and crowbars. You'll need it to make a fire, open canned food, craft more rags, and skinning carcasses and corpses. Read more on their extensive uses in the Weapons and Tools section. Keep at least one or two with you to last you for a while.
While on the blade topic, always pick up at least 2 stones or bones to craft an improvised knife. To make a stone knife, use a small stone on another small stone, and vice versa for a bone knife.
When it comes to medical items, some less obvious choices are alcohol tincture, iodine tincture, or disinfectant spray. These will help you prevent and treat yourself of the common wound/blood infection caused by dirty rags. Multivitamins and tetracycline pills are both life-savers. Chlorine tablets let you purify water in any container. Charcoal tablets are used to cure the progressively lethal cholera. IV start kits can be used on saline bags to be used to regenerate your blood regardless of your blood type. Sewing kits are more useful to repair items, but when in an emergency without any bandages, you can sew yourself up using one.
Blood-test kits don't take a noticeable amount of blood from you and instantly tell you your type on your blood icon in the HUD. Use it as soon as you find it.
One of the best things to find are cooking pots. Frying pans are also ok, but pots hold so much water it's crazy. You can boil dirty freshwater over a fire to purify it, or use a chlorine tablet to make it clean. You can store the same amount of items inside of it as it takes up in your inventory, though it'll get wet. As long as it isn't fire-making supplies like bark or paper, it doesn't matter what gets wet. You can also keep explosive items like mines and gas canisters completely safe inside of it, as it counts as a container. So its inventory space is extremely convenient, it holds a ton of water that you can purify easily, you can cook or boil lots of food simultaneously, reducing the cooking time by a crazy amount. Very good item, 10/10, would be a little heavier for again.
9V Batteries will be helpful to collect, as you'll need a collection to power the LED hud of gun optics, flashlights and headtorches, as well as radios.
Lockpicks help massively to secure an area. All locked doors can be shot or melee'd to unlock again.
Repair items are very very useful. Duct tape, rope, sewing kits, leather kits, epoxy, sharpening stones, and gun cleaning kits (if you have the space). Tire repair kits can be used to repair damaged gas masks, and electronic repair kits repair damaged gun optics.
Binoculars and rangefinders can help you peer far into the distance. Helps you range your sniper or scope out an area for players.
Fishing rods and fishing hooks are extremely useful, as improvised fishing gear yields smaller amounts of fish. Actual fishing gear yields large fish. It's awesome.
Fireworks are pretty. Wait until nighttime to set off, and keep in mind players can hear and see the fireworks from far away.
* Useless Items To Avoid - As with important items, you need to know what to drop.
Gas canisters. They will explode when ruined, instantly sending you unconscious. Every single time a zombie hits you it slowly decays the durability of the canister within your pockets. Taking a shot to the chest will penetrate your shirt, ruining it, and making the gas canister ruin and explode instantly. Players can also shoot it while it's in your hand.
Its only use is to use with a gas stove and cooking pot. When combined with a gas stove, it no longer poses an explosive risk in your inventory. When combined, the gas canister and gas stove together takes up a small 4x4 area in your pockets. Gas stoves are very helpful for cooking food and warming up on the go, but gas canisters are unnecessary without one, so remember to at least put it in a container like a pot or teddy bear.
40MM Grenade Launcher Ammo will also explode when ruined, including when on your vest's slots. Putting them into a container is important.
Blowtorches can only be used on cars, and are not melee weapons unfortunately.
Gas lamps do nothing.
GPS Receivers and Field Transceivers are useless.
Flare guns and flare rounds are useless. The flare in the sky lasts for a whopping 60 seconds.
Base-building items are not worth picking up - Xmas lights, battery chargers, cable reels, generators, construction lights, sheet metal, codelocks, nails, barbed wire, and farming items like seed packets and garden lime. With garden lime you can combine it with leather to tan it. You can then use 2 tanned leather on each other to craft a backpack. Garden lime is very uncommon and having two pelts around is very situational.
back to top
 II. Basic Medical Care
* In this chapter I discuss your health, food, water, and temperature stats with a full breakdown of the blood stat and bleeds system. I also go over your two invisible stats, shock (what causes unconsciousness) and your immune system (what makes you vulnerable to sickness). Then I mention the most common diseases - wound infection, how the common cold progresses to the flu and then pneumonia, cholera, salmonella, and chem poisoning. And finally, I'll end with what medical items to pick up and a warning on how you can explode yourself by carrying dangerous items, like gas canisters in your inventory or even in your hand.
* Understanding your Health - Any time your health icon has the down arrow (one, two, or three), your health is draining. This can be directly from a recent injury, or it can be from your food or water being red, your temperature being hyper/hypothermic, or a deadly sickness like pneumonia.
All icons on your HUD have only 5 different icons it will use depending on your true stats. Temperature has 6 unique ones. The names you'll hear for them are full white, chunked, yellow, red, and then flashing.
* Shock and Unconsciousness - Losing blood does not directly drain your health stat, rather draining an invisible stat called shock. While bloodloss doesn't drain your health stat, you can still bleed out and die once you hit flashing blood - you don't have to be flashing health to die from bloodloss either.
The most common way to pass out is by being hit by another player using a weapon or from their fists. Large blunt objects like sledgehammers, pipe wrenches, and fire axes have a shock damage modifier. Heavy attacks with or without a weapon are unblockable and deal a whopping amount of shock damage while stumbling you backwards. Zombies don't deal much shock damage unless you endure multiple attacks from multiple zombies all at once.
The only indicator of a falling shock stat is when your vision goes dark at the corners of your vision. If your shock drops under the value of 26, you'll temporarily lose consciousness until you've regenerated your shock back to 50. Depending on the cause, it varies how much time until you wake up. During this, zombies, wolves, and bears will walk away from you, and another player can resuscitate you if they wish.
While unconscious, pressing the escape key pulls the menu up. You can exit to leave the server or respawn to end your life, but keep in mind both of these options kill your current character. The only way to wake up from unconsciousness is naturally after a number of seconds, or from a player resuscitating you. The longest uncon time is 50 seconds from stepping on a landmine.
Popping an epi-pen on anyone makes them immediately wake up, restoring their shock to full. This can be very helpful for an emergency situation where you don't have much time to resuscitate the player. Unfortunately this doesn't work on survivors who are passed out from blinking blood, more on that in the advanced section.
* Starving and Dehydration - When your food and water icons eventually hit red, you'll start a slow countdown of starving or dehydrating to death. Jogging will help perserve some energy and has a slower water loss than sprinting, only being slightly slower and doesn't drain your stamina. Sprinting should usually only be used in combat situations, or if you're not worried about your food situation.
Long after hitting red food or water you'll eventually hit flashing. Keep in mind you cannot die directly from red/flashing food or water without first hitting flashing health. Periodic sound effects start happening when you've hit red. Your stomach growls from hunger and being thirsty makes your character smack their lips dryly or gulp. Your character's sound cues can be heard by other players within earshot.
Your food stat is called your "energy", and all foods have a different caloric and water value. Food can restore some of your water stat, unless it's something dry like cereal or chips. Boiled food has a slightly lower caloric value in trade for its higher water value.
The only way to raise these stats is by consuming food or water. You can eat raw food without risk of salmonella by first taking a multivitamin pill. The only exception to food that is helpful is rotten or burnt food, which have a very high chance of making you immediately vomit, sending you back to starving or dehydrated.
Unpurified water can be consumed without risk of cholera as long as you take a multivitamin first or have a full immunity. Keep in mind saltwater cannot be purified, collected, or used to wash your hands.
Watch out for the full stomach icon, and only continue eating or drinking after it goes away. If you continue to eat or drink after seeing this icon your character will vomit up a large portion of your entire stomach contents, making your energy and water stats plummet. Your character will not immediately vomit after receiving this icon however - you can still eat and drink a little before it will actually make you puke.
* Hyperthermia and Hypothermia - White temperature is normal, comfortable temperature. Light blue is slightly under comfortable. Dark blue and flashing blue is freezing/hyperthermia. Your character experiences a health and energy drain, occasionally shivering and grunting in pain when you are freezing/hyperthermic. Yellow temperature is hot and red temperature is hypothermic. Being too hot will occasionally make your character pant and wipe their forehead, while being hypothermic slowly drains your health. Your temperature is referred as your "heat comfort".
Directly stepping in or laying on a fire will not heat up your temperature stat, instead instantly draining your health until death if you continue to stay in the fire. Any of your clothes that touched the fire will likely be damaged as well. Btw with fire barrels you can lay ontop of the grate without any health loss you will feel so powerful.
Being wet from rain, snow, or water completely nullifies the "Insulation" factor for each clothing piece, as well as adding lots of weight to it. This doesn't mean much on hotter maps such as Cherno, but while on winter maps it will make you freeze to death much faster.
Running will make your character more warm than standing still, meaning your temperature will constantly fluxuate depending on what you're doing and how cold the world temp is. Light blue is not enough to make you catch a cold, but it is an early warning that your body temperature will be cold enough soon to start fluxuating into dark blue. Even on light blue you will periodically shiver, so if you're trying to stalk someone close-by, popping a heatpack will prevent any unwanted character noises. Gagging yourself will also muffle your shivers, but you won't be able to wear a mask at the same time.
* Understanding Bleeds & the Blood Stat - You will always spawn with a full 5000ml of blood in your body, indicated by the full white blood symbol in the bottom right of your HUD. At flashing red blood, you will fall unconscious periodically. This will stop once you've regenerated your blood back to red. If you're unable to stop your bleeding while on flashing blood, you will eventually die of bloodloss when your blood stat hits 1500ml.
The main disadvantage from major blood loss is the vision saturation loss, making players blend in with the surroundings quite easily. Blood does not regenerate on red food or red water, meaning the only way to naturally gain blood back is food and water. You can also speed up blood regeneration with a saline bag or gain blood back from a compatible iv-blood bag.
There is instant blood loss from each gunshot or stab wound you endure, but most blood will be lost from light, medium, or heavy bleeds. If you have nothing to bandage with, after 5 minutes it will clot by itself, bringing a small risk of wound infection. Not bandaging for 5 minutes becomes riskier to do when you have multiple bleeds, or no disinfectant to treat your potential oncoming wound infection. Always be aware that bandaging makes you an easy target to other players within earshot who want to get the drop on you. You should only prioritize immediate bandaging when you have multiple bleeds of any kind.
* The Three Types of Bleeds - There are hand & feet bleeds, which we’ll call a light bleed, drain 2 blood per second. Arm and leg bleeds are medium bleeds, draining 12 blood/sec, and head and torso bleeds are heavy bleeds, draining a whopping 20 blood/sec. Every bleed stacks bloodloss. This is why it's important to carry multiple bandages, and the good news is that rags and bandages are not the only items you can use to bandage with.
To understand what kind of bleed you have, look down at your body or open your inventory and look where the blood is physically coming out from. A cut from getting punched for example will usually be a single light bleed, meaning you have an extremely long time to find bandages or find cover to bandage before it ever threatens your life.
Understanding the severity of the 3 bleed types will help you figure out how much time you have before you’ll actually need to worry about bandaging a cut. In gunfights or altercations, immediately bandaging nearby will give other players a chance to bumrush you while you're animation locked.
* The Four Types of Bandages - Rags and bandages are going to be the most reliable items for bandaging throughout your character's life. Whenever you've used all the rags you spawned with and don't have a sharp blade to cut up clothing into more rags, bandanas and sewing kits are commonly found and can also be used to close your cut. The time it takes to bandage with a rag, sewing kit, or bandana is 10 seconds per bleed, while bandages take 2 to 3 seconds per bleed, and have a maximum of 4 uses per bandage. Every time a rag takes damage in your inventory (from getting hit or shot) it will become disinfected, but don't worry yourself because any kind of disinfectant item lasts for a really long time, and items rarely lose quality in your pockets unless you've taken a major blow.
Multivitamins - Boosts immune system to 100% for 5 minutes. Prevents and also treats common cold, salmonellosis, cholera, heavy metal poisoning, and influenza. Does not treat any stage of wound infection. Can be taken in combination with tetra.
Tetracycline - Does not prevent any illness. Treats common cold, influenza, cholera, pneumonia, and specifically stage 2 wound infection. Can be taken in combination with multivitamins.
Charcoal Tablets - Treats salmonellosis. Can refill gasmask filters, and used to create improvised gasmask filters.
Water Purification/Chlorine Tablets - Cleanses all tainted water from harmful pathogens (other than heavy metal infected water found only on Sakhal).
Chelating Tablets - Acts the same as water purification tablets. Introduced with Sakhal to treat Heavy Metal Poisoning, but effectively treats any tainted water of every disease.
Alcohol Tincture, Disinfectant Spray, Iodine Tincture - Prevents wound infection if used on dirty rags, bandages, bandanas, and sewing kits before use. Cures stage 1 wound infection once contracted. Does not cure stage 2.
Stims - Epi-pens are for adrenaline for 60 seconds, morphine is for curing a limp for 60 seconds, codeine is to suppress grunting, sneezing, and coughing for 5 minutes.
Immunity-based Sicknesses -> cold/influenza/pneumonia, salmonellosis, cholera, and heavy metal poisoning.
Not influenced by Immunity -> wound/blood infection, chemical poisoning, gas poisoning, and kuru (incurable).
* Immunity System - Your immunity is an invisible stat used to judge if your survivor can contract these specific sicknesses: the common cold, cholera, salmonella (and heavy metal poisoning on Sakhal). Your immune system is judged by your combined stats. Keeping your blood, food, water, and temperature white will 100% prevent you from contracting these 4 sicknesses. You don't need full white for your immune system to fight against these sicknesses, it's a dynamic meter judged off all of your stats. WOBO has an awesome tool that shows you exactly what your immunity is at with any combined stats.
Multivitamins boost your immune system to max for 5 minutes, meaning you can stay cold, eat raw meat/bear and wolf steak, and drink dirty water/eat snow without getting sick for as long as the pill icon is on your HUD. Pills do not stack, you have to take them one by one once they wear off.
This does not effect contraction of wound infection, chemical poisoning, gas poisoning, or kuru.
* Common Cold -> The Flu -> Pneumonia
* Stage 1 - The common cold is an extremely contagious sickness that survivors randomly contract after being cold for too long. This mechanic runs on a timer that is postponed by becoming warmer (neutral white or above), resetting the timer fully within approx. 10 minutes of maintaining a non-blue temperature. While the timer is random, infections generally occur after 4–15 minutes of continuous cold exposure, depending on how low the heat comfort is. A temperature buff (the +) gives you 5 minutes of grace period against gaining the cold, and when a survivor cures themselves of a cold, there is a 15 minute grace period. On Sakhal specifically, survivors spawn with a 15 minute grace period to the common cold. It's worth to note that the medical thermometer is a useless item and not worth taking with you.
To prevent a cold, keep yourself warm with fires if your temperature is light blue or below and keep your clothes wrung out and dry. Around other survivors with the sickness, do not consume any food or water they've eaten or drank from first as it has a 100% contraction rate. Do not inject yourself with their blood if they were sick during the draw.
Try to stay at least 3 meters away from them, as their sneezing can infect you. Face masks like balaclavas, ski masks, dust masks, surgical masks, mime masks, biker helmets, welding masks, OKZK caps, coifs, knight helmets, and gasmasks can be worn as a form of potential protection. Only gasmasks worn by either survivor will 100% prevent the transmission. Boiling infected water in a pot will purify it, along with using chlorine or chelating tablets. Fully emptying water bottles/glass bottles/canteens/pots will remove the sickness from the container. There is nothing you can do to purify food from the sickness, and it has a 100% infection rate.
To identify a cold, you'll see a sick icon on your HUD and your survivor will start sneezing periodically. Sneezing is the only symptom of the first stage, and it's extremely contagious. The only downside to sneezing is that other survivors will be alerted if you sneeze nearby. Any food or water you consume will become contaminated, meaning anyone who eats or drinks something you ate while you were sick, they'll contract the sickness from you. This includes yourself after cured, so always purify water you drank while sick, and never share food with sick people or when sick.
To treat a common cold, you will either need to take multivitamins or raise your immunity by being warm & dry and consuming food and water. Keep in mind taking multiple multivitamin pills at once (or taking tetracycline pills in the first stage) will not help you get over the cold faster. Take pills consecutively only when the pill symbol disappears on your HUD for max efficiency (it disappears after 5 mins). You will need to be cold and have a weak enough immune system for the infection to progress. Otherwise, the cold will naturally fade within 30 minutes.
TLDR: To prevent your teammate from getting sick, wear a facemask (especially a gas mask), stay 3m (10 ft) away from them, and let them eat/drink food or water before you share it with each other. Do not give them your blood. If you were sick while your blood was drawn, your sickness will spread to anyone who injects themselves with your blood, including yourself when cured.
* Stage 2 - Influenza is only gained by letting a cold progress (low immunity/cold temp) within 15-25 minutes. The rate the disease progresses depends on the heat comfort level of the survivor. Influenza needs to be treated with consecutive tetracycline pills. Multivitamins will boost your immune system, so taking them at the same time with tetra will boost your chances of recovering from influenza. Staying warm, fed, and/or medicated will help you recover.
Symptoms include increased sneezing, as well as coughing, fever (screen blur), and water drain (from fever). When successfully treated, it will lower back to stage 1, requiring another 15 min to fully recover. You receive a 10 min resistance to it progressing back to stage 2 after it drops back to the first stage.
* Stage 3 - Pneumonia is caused by letting influenza progress in the following 10-20 minutes by not attempting to raise your immunity/warmth or take any medication. This will happen in ~ 30-50 minutes after initially contracting the common cold. In addition to sneezing, coughing and fever from the previous stages, survivors will also experience higher stamina drain, slower stamina regeneration, gasping for air, and constant health loss. The dropping health will result in death in about 20 minutes.
Unlike in the preceding two stages, multivitamins, staying warm, and a strong immune system will no longer cure the disease. Taking tetracycline pills will lower the disease stage back to stage 2. After this, the survivor can continue to treat the remaining stages with tetracycline, multivitamins, immunity or heat comfort. When the disease stage drops to the Influenza stage, you gain a temporary resistance to it progressing back to stage 3 for 10 minutes.
* Wound Infection - Quickly identified by a sickness icon on your HUD showing up immediately after bandaging or letting a wound close, with periodic grunting in pain (commonly called the "oomphs”), and fever (screen blur, wiping sweat off your forehead, water drain). If left untreated, it will progress into the deadly stage 2.
To prevent wound infections, make sure to disinfect your rags, bandages, bandanas, and sewing kits before using them to treat wounds. Whenever disinfected items get damaged, they will no longer be disinfected. Check for the Disinfected tag on them in your inventory, and use iodine tincture, alcohol tincture, or disinfectant spray on them if not.
To treat wound infection, as long as the survivor is still in stage one of the infection, it can be cured by disinfecting the wound using disinfectant spray, iodine or alcoholic tincture. In this stage, tetracycline has no effect on the disease.
* Stage 1 - Your character will periodically make a sound of pain, fever (screen blur, wiping sweat off forehead, water drain), and your stamina regen is 50% slower. Stage one lasts for 20 minutes. Curable by using iodine/alcohol tincture or disinfectant spray once on your wound by putting it into your hand and right clicking.
* Stage 2 - Noticeably louder sounds of pain and more consistent fever symptoms. In addition to stage one, stamina regeneration being another 50% slower, your hands will shake, you will lose additional 12 mL of water per minute, all while your health will drop 2.5 units every minute. This means that if you have full health, you will die within 40 minutes of reaching stage two, unless the infection gets cured. Curing stage 2 will take 2-4 tetracyclines, depending on how early the treatment is started. During this stage, disinfecting wounds is still possible, but doing so will only temporarily prevent the infection from progressing further.
* Salmonellosis - Contracted by eating raw meat without the immunity for it, eating with bloody hands after harvesting an animal or person, and eating bear and wolf steak. A common way to dodge bloody hands is by making improvised hand wraps using 2 rags. Once it's ruined it loses its protective quality against the disease as with any pair of gloves. Taking multivitamins before eating wolf or bear steak will give you immunity for 5 minutes.
Prevention, treatment
* Cholera - Contracted from drinking dirty water from found containers or eating snow (Namalsk only - Sakhal's snow causes a different disease), drinking from water pumps with bloody hands, drinking untreated water from streams, ponds, or lakes. Symptoms include vomiting, fever, 90% stomach capacity loss, and further hydration loss as the disease develops.
Prevention includes always purifying your water with chlorine tablets, dump found water in containers and refill at a pump, boil snow or water with a cooking pot, or use chelating tablets. It's also entirely by taking a multivitamin pill before you drink anything, giving you immunity for 5 mins.
Cured by taking Multivitamins or Tetracycline 2 to 8 times, or 1-3 when taken in combination. Wait 5 minutes for the pill symbol to disappear before taking another pill of either, as doubling up on the same medicine does nothing. Raising your immune system (all stats combined) can cure you as well, though be wary of your stomach being shrunk.
Stomach Shrinkage: Please keep in mind cholera is one of the hardest diseases to survive as you'll need food and water consistently to survive the incessant vomiting. As your stomach gets smaller by 90%, you need to eat and drink very slowly. Take a few bites or sips and keep note of the arrows on your stomach HUD icon. When the arrows go back down, you can continue taking a few bites/sips. Keep in mind cholera is contagious! Do not share your food, water, or blood with anyone else, and don't save food after taking a few bites as it's now infected.
* Chemical Poisoning -
* Gas Poisoning -
* Hemolytic Reaction - Is not a disease or sickness, but rather the lethal reaction a survivor has to incompatible blood types being injected into their bloodstream. I will cover bloodwork more extensively in the Advanced chapter, but keep in mind incompatible blood infusions will cause a survivor to pass out instantly, then die.
* Heavy Metal Poisoning (Sakhal) - Contracted by eating snow on Sakhal, caused by the volcanic ash. Avoided with a preemptive multivitamin or chelating bottle. Cannot be boiled out like cholera.
Treatment and Prevention
* Kuru - Contracted from eating human meat or fat. Can be ingested unwillingly if you find a random piece of fat: there's no way of telling if fat came from a player or an animal. Symptoms set in slowly, with the most consistent symptom being laughing. Yes, it's loud. Further onset symptoms are extreme twitching while aiming down sights.
It's very hard to be a sneaky cannibal with the laughter, and most players will kill you on sight or think you're suspicious if they know you're a cannibal. Gagging yourself will make the laughter quieter, but you can't wear a mask while gagged. Kuru is entirely incurable.
back to top
 III. Food and Water
* Do not consume rotten, moldy, or burnt food even when starving to death. These will induce vomiting which empties your stomach contents, starving you even faster. Dried fruits and vegetables are completely safe to eat. Unknown food cans are safe to eat ONLY in a few bites at a time as it will give you food poisoning if eaten too fast. As the basic medical section mentioned, raw meat, rotten, unknown, mouldy food or dirty water can be consumed in absolute safety if you've taken a multivitamin pill or have a full immune system. Multivitamins and your immune system, on the other hand, will not give you immunity to chemical poisoning against burnt food or gasoline.
Without a pill or a high immune system, unknown, rotten and mouldy food will give you salmonella, making you throw up consistently. Burnt food and gasoline will give you chemical poisoning, which will also make you throw up constantly. Throwing up is the fastest track to fucking yourself over if you're struggling to find food or water. Drinking as much water as possible can help someone starving to death, and eating food can help someone that needs water (except for dry goods like rice, cereal, chips, powdered milk, zagorky, or salty sticks). Saline bags restore a very small amount of water as well, but it's not worth it in the end.
* Canned and Fresh Food - To find food, search towns. Zombies can drop food as well, so they're worth to check. Canned food is found mostly in houses or cars. Canned food requires a tool to open, and depending on which weapon you use, you can lose a large percentage of the food content. Knives or a screwdriver, for example, work way better than a sledgehammer or a meat tenderizer. Small 1-2 slot food items have a pull tab and don't require a tool, just hold it in your hand and press left click to peel the lid back. The only exception to this are canned sardines, which need a tool to be opened.
Greenhouses can spawn fresh food like zucchini, tomatoes, or peppers. On the ground under certain trees you'll find small fruits - apples, pears, and plums. All dried food is completely safe to eat. Look out for orchard areas where fruit trees are grouped together in a fence. You won't find fruits sometimes as they take player activity to spawn in gradually. Mushrooms spawn randomly or next to fallen logs in the forest.
Food can sometimes be impossible to find, so learning how to fish, hunt, and trap will help you stay alive. Veggies, fruits, and all mushrooms don't require cooking before becoming safe to eat, though cooking them all will give you more calories, which will keep you less hungry for longer. All mushrooms are safe to eat and there are no poisonous variants. Specifically pumpkins and potatoes will need to be cut with a blade before the game lets you consume any of it.
* Water - Water can be found in containers and almost every town will have a designated water pump. Cooking pots are the best item to hold water in compared to water bottles, glass bottles, or canteens. You can put any item inside the pot safely while full of water, though avoid putting in fire-starting supplies as they don't work when wet. All water found in containers have a chance to be dirty, meaning it has a chance to give you cholera. Water from water pumps or wells are always clean. Always take water purification tablets with you if you don't know where any water pumps are. Multivitamin pills give you 5 minutes of immunity from contracting cholera from dirty water.
* Hunting - You will find deer, boar, hare, foxes, wolves, and bears by venturing into the forest. Wolf and bear meat give you salmonella, so make sure to take a multivitamin before consumption to avoid puking your food back up. If you don’t have a good shot, try slowly rotating around the animals at a safe distance. If they catch a glance (even from long distances) or hear you get too close, they will be spooked and run away. You can continue to hunt them cross long distances as long as you have a good sense for which direction they're headed or get lucky and hear them make their respective noises again. Bodyshots to animals in this game give you less meat and you’re more likely to make them run without killing them. If you have to shoot them at a bad angle, at least be ready to shoot them more than once. If you have a pistol or Sporter you’ll probably find yourself shooting the animal a lot more than other guns.
Fishing is always an option as long as you have a long stick and a rope to make a rod, a blade to make hooks from short sticks/bones, and a blade or tool to dig up worms. Shovels and hoes give extra worms for each interaction circle, making them extremely helpful for fishing.
Fishing traps can also passively catch fish while you’re in the area. Netting + metal wire to craft them, place them in some water, and you’re good to go. Keep in mind rotten or burnt food are not worth eating as they induce chemical poisoning and will make you throw up. Raw mushrooms can be eaten but they have more calories if cooked. If playing on a winter map you will need to defrost food using a fire. In 1.28 they messed up defrosting times, firewood in your fire will defrost the food, while an entire stick fire will not defrost it. Having frozen food in your inventory slowly warms it up.
If starving, killing other players for their food might be one of your only options. If you kill someone and they have nothing, you might have to eat them if you’re very close to death. The disease that comes with is permanent with no cure, negative symptoms that make other players distrustful. But it won’t kill you.
* You cannot eat or drink while wearing a gasmask. You can't eat or drink while sprinting. If another player is facing you, you can feed them or give them water, though it takes longer to feed someone than if they just ate it themself, but feeding someone water is the same speed either way.
back to top
 IV. Fires and Crafting
Fires are an essential part in keeping healthy in DayZ: do not underestimate them. Aiding the regeneration of your health and keeping you from getting sick, you won't really need a fire until you're dark blue or badly injured (red or blinking).
Once your temperature hits dark blue, you'll need to make a fire within ~15 minutes to completely prevent getting influenza. You can avoid making a fire entirely by taking a single multivitamin, as influenza checks your survivor's immunity status before you're eligible. * The only things you need to start a fire are: a sharp object of any kind and to be near some brush and trees respectively.
* To start a fire you'll need tinder, fuel, and something to light it with.
To obtain tinder, put your sharp object in hand and walk up to the bark of a tree. Interact with it until the circle is complete, and your bark will be on the ground at your feet. If you don't have a road flare, matches, or a lighter, grab two bark instead of one. You'll use the second piece to craft an improvised firestarter. Tinder is only used to start the fire and doesn't effect the length or temperature of the fire.
To obtain fuel, walk up to a bush empty-handed and interact with it until the circle is complete, and your stick will be on the ground. If you aren't wearing gloves, be aware there is a chance the bush will cut you. There are 3 types of bushes in DayZ that give you different fuels: if you need to make an improvised firestarter, make sure to get long or short sticks instead of firewood. Long sticks can be broken down when put in hand to make short sticks, while firewood cannot. If you don't need the improvised firestarter, don't worry about what type of fuel you get. The more fuel you get, the longer the fire burns, and if you use firewood, it burns hotter and longer than a stick fire.
Firestarters come in 3 forms and 1 improvised version using a short stick and a single bark. You will usually spawn with a road flare, which is supposed to be used as your first firestarter. Once lit, they burn for 20 minutes and cannot be put back into your pockets. Other players can see the light they emit from a distance. You might have also found matches or a lighter, which are incredibly useful items that last a very long time, so there's no need to carry both. If you have none of these items, you can craft an improvised hand-drill kit from one piece of bark and one short stick. Put either item in your hand and drag the other onto the "combine" option. It'll pop up "Craft fireplace" but that isn't what you want, so scroll once using your mouse scroll-wheel to change the crafting recipe to "craft hand-drill kit" and then hold down right click until the completion wheel is full.


Fires using a fireplace or made manually work a little differently.
* FIREPLACES & BARRELS - Houses and barrels have built-in fireplaces that you'll use to make your fire. Sometimes the UI won't pop up immediately, but once you put tinder or bark inside of it by holding it in your hand and looking at the fireplace and pressing F to place it inside, it will appear. If the fireplace has an oven door, make sure to open it to access the fire UI. These are easy to use, just put your tinder and fuel inside and then put your firestarter in hand to light it.
* MANUAL - The easiest way to make a fire without a fireplace or barrel nearby is to place your tinder directly onto the ground and light it with your firestarter in hand. Your tinder will catch and you'll want to place your fuel onto it immediately before it goes out.
In some circumstances, your tinder won't catch. Check to make sure your tinder/fuel isn't wet. You'll have to get another piece of bark to try again either way, but don't try again in the same place if it's windy or raining. If it's windy/raining, your fire will need some sort of protection from the elements. Try making it against any sort of wall or building, or even a tree.
* GENERAL NOTES:
If you haven't got a sharp object, look out for stones on dirt roads, two combined will make a knife. Keep an eye out for bones near doghouses, garden sheds, or dead people and animals. As long as there's two bones in the stack you can craft a bone knife out of the stack.
If your tinder or fuel is wet, they are unusable. Harvest new tinder or fuel to get dry pieces. The wet pieces will dry out very slowly, and if your clothes are wet drag the items off of yourself as you will make them stay wet. Putting fire items in a container will protect it from the rain, though using a pot with water in it will dampen the items.
Fires have a radius of heat that goes through doors and walls. If the situation calls for it, you can make a fire outside of a building and sit next to it through a wall or door to get warm.
While you can use your sharp object to get sticks from a bush, it is a waste and should only be done if you don't want to risk getting cut if you don't have gloves or any bandages.
The HEAT BUFF is the way to keep your character warm for longer. After sitting next to a long enough fire, your temperature will start to show a plus icon. You can have a maximum of three pluses, meaning you're at max heat buff. On winter maps the heat buff is the way to stay alive and keep from getting a cold.
* RELIGHTING - When a fire goes out, one fuel will need to be placed inside of the fire before blowing on it to revive the flame. If the fire is too cold, tinder will be needed along with the fuel and you will need to relight it with your firestarter. It takes a long time for a fire to become cold so always try the first option.
back to top
 V. Weapons and Tools
* There are 5 modifiers applied to all melee weapons. Sharp or blunt, and long, medium, or short. All weapons are more powerful through heavy attacks since other survivors cannot block through it. Heavy attacks cost more stamina and have longer animations. Many items have unique individual qualities, such as the can opener being able to open cans but can't be used as a blade otherwise.
* Depending on the short/medium/long length of a weapon, the damage and shock dealt raises. The range in which you can reach a survivor raises from this too, but short and medium weapons share the same range. Heavy attacks with long length weapons cause you to lunge forward before hitting your target, and running heavy attacks will allow you to quickly close a few meters gap. Both of these attacks stuns and knocks your target back on impact, allowing you to continuously stunlock them backward until unconsciousness or even death.
* Light attacks are extremely viable with small knives and aiming for the head/throat. Less effective on players than zombies, as they can use a heavy attack on you and stunlock you out of attacking. The animation is so short that you'll find better damage and shock out of consecutively chaining light attacks. Using this in a safe eye-level spot with zombies such as the windows in the green guardshack, you can quickly kill an extreme amount of them.
* Sharp - Blades are the #1 most important tool to find when starting a life due to their important crafting abilities. These weapons deal an increased bleed factor, basically one bleed for each cut, while not doing much shock damage.
They are a huge factor in staying alive, used for opening cans and preparing some types of fresh food, shaving bark off trees for fires, cutting thin clothes into rags for bandages, and stealth killing zombies (knives & machetes only). There are 29 sharp weapons. Sometimes they can be hard to find though, so there's two types of improvised knives. Always check for stones on dirt pathways and bones in garden sheds, next to dog houses, or from pre-cut up dead animals or survivors. Deceased survivors might have a blade, stones, or bones in their pockets as well. By using 2 small stones or 2 bones on each other you can craft an improvised stone or bone knife. They have low durability but get the job done. If you find a boulder, you can use 1 bone or 1 stone on it to make your knife.
Other uses are digging up worms from grass, cutting a short stick or a bone into improvised fishing hooks, crafting an improvised crossbow bolt from a short stick, whack bushes for sticks (optional, can do this with your hands. small bleed risk if no gloves), cutting an animal or player's body into meat, fat, bones, and guts, turning long sticks into sharpened sticks for cooking meat over a fire, cutting rope or duct tape restraining another player's hands, turning a human skull into a skull mask, turning guts into rope, shaving your beard, and the ability to commit suicide, unlike blunt weapons.
Blades are repairable with a sharpening stone.
* Screwdrivers (15 dam, 18 shock, 3.3m) are the worst blade.
* Weaker Blades (25 damage, 12 shock, 3.3m): Bone Knife and Steak Knife
- Short (28 damage, 14 shock, 3.3m): Kitchen Knife, Cleaver, Hatchet, and Sickle
* Stone Knives (18 dam, 25 shock, 3.3m) are better than the average short bladed melee.
- Medium (32 damage, 16 shock, 3.3m): Ice Axe, Oriental Machete, Kukri, Fange, and the Crude Machete
* Shorter Strong Blades (38 damage, 18 shock, 3.3m): Hunting Knife and Combat Knife
- Long (38 damage, 18 shock, 3.7m): Pickaxe, Fireaxe, Splitting Axe, Pitchfork, and Sword
* Improvised Spears (30 damage, 40 shock, 3.7m) are crafted with a sharpened stick and a stone or bone knife. Best sharp item due to the extreme shock damage.
* Bayonets: All gun bayonets do 20 damage and 7 shock when used by gun-meleeing (F with gun in hand). There is no information on what stats they have for normal melee, but can be used as normal (most likely short) knives all the same.
* Saws: The two saws have slightly different uses and stats, but universally they can gather bark, skin carcasses/corpses, open cans, cut rope/tape restraints, gather rags from thin clothing, and used as a blade in crafting. Saws cannot be used to shave beards, commit suicide, or be put on your shoulder slots, but can be placed on a backpack slot. They are both used in base building for cutting lumber into planks.
* The Handsaw does 45 dam, 20 shock, 3.3m, and takes up 10 slots.
* The Hacksaw does 25 dam, 12 shock, 3.3m, and takes up 8 slots. It's uniquely used for sawing off guns. The only gun worth sawing off is the FAMAS, as it has no optic attachments and the iron sights are obtrusive.
* Blunts - These are the best zombie-killing weapons to carry with you due to their durability. Blunt weapons deal extreme shock damage while being heavier to carry, very durable, but irrepairable. There are 14 blunt weapons, but baseball bats have 2 craftable variants, and lit brooms work better than unlit ones. They work extremely well against survivors, but an armed player aiming their gun at you can cancel your attack by shooting you, unless they miss.
* Blunt weapons can also open food, but it spills an extreme amount of it in comparison to blades. They can also be used as hammers to use in base-building or to knock large stones off of boulders, depending on the item. Brooms oviously can't, but meat tenderizers can.
Stats are heavy attacks, 0 health = death, 100 shock = unconsciousness.
* Broom (10 damage, 15 shock, 2.2m) can be broken in half to obtain 2 long sticks. Essentially a portable cooking stand (1 long stick + 1 long stick) on your shoulder slot.
* Meat Tenderizer (15 damage, 25 shock, 3.3m) cannot be used on meat.
- Short (15 damage, 25 shock, 4.1m): Tire Iron, Pipe, Wrench, *Crowbar (can be used as a blade as well)
* Lit Broom (15 damage, 35 shock, 2.2m) crafted by igniting a broom on a fire or simply using matches or a lighter.
* Farming Hoe (28 damage, 14 shock, 4.1m) used in farming, but truly the best for the increased worm yield for fishing. Repairable with sharpening stone. Can bury corpses, containers, and fire ashes.
* Barbed Baseball Bat (22 health, 35 shock, 3.7m) unfortunately worse than a normal bat. Description references Lucille from TWD.
* Brass Knuckles (25 damage, 40 shock, 2.8m) cannot be used to open food, but extremely concealable.
- Medium (25 damage, 40 shock, 3.7m): * Shovel (shares unique abilities with the Farming Hoe), Baseball Bat
* Nailed Baseball Bat (25 damage, 45 shock, 3.7m) best bat variant, +10% bleed chance than the barbed bat.
* Hammer (30 damage, 35 shock, 3.3m) used in base building.
* Pipe Wrench (25 damage, 60 shock, 4.1m) not usable for anything but meleeing. On Namalsk, it has a unique purpose at the Oil Rig.
* Maces (30 damage, 75 shock, 3.7m) are tied with the sledgie for the top of this list. The only reason it loses is it's rarity, only being found at castles.
* Sledgehammers (30 damage, 75 shock, 3.7m) are commonly known as the number one best melee weapons. It used to be a one heavy-hit KO, but is now around a 2-hit KO. Heaviest but most durable and reliable melee in the game, while being relatively common to find.
back to top
 VI. Advanced Medical Care
* These are medical situations that will be the most dire to survive. I go over using stims like epi-pens, morphine and codeine, treating extreme blood loss, blood transfusions, saline bags, and IV kits, broken legs and the lethal broken neck stat, and all about toxic gas zones and how kuru works.
* It's important to note that dynamic gas only exists on specific maps, such as Chernarus and Livonia, while Sakhal has no gas at all, neither dynamic or static. Modded maps are specific to themselves, for example Namalsk only has static gas zones.
* Stims 101: Epi-pens, Morphine, Codeine
(60 seconds) Epi-pens are uncommonly found items in medical areas. Administering max shock to the subject, it wakes unconscious players immediately and gives players infinite stamina and max shock for a full minute, meaning you can infinitely run and jump as well as have a better chance to stay awake when enduring shock inducing damage from guns or melees. When administered to an unconscious player, they will wake up immediately unless they are unconscious from flashing bloodloss.
(60 seconds) Morphine pens are uncommonly found in medical areas. It removes any limp debuffs your survivor has and suppresses cold/flu sound effects like sneezing and coughing for a full minute. Survivors gain limps from medium to low health, while severe limps are caused by flashing health or broken legs, prevent you from jumping or sprinting at all. These should only be used on severely injured survivors who need to be able to sprint away or jump on obstacles for a short period of time. They can also be used to suppress cold/flu related sound effects for close-range stealth, but is overkill in comparison to codeine.
(5 minutes) Codeine pills are uncommonly found in medical, prison, hygiene, and civilian areas. Taking a codeine will lightly effect limping from low health, letting you move and jump a little better. It does not reduce shock from walking on an unsplinted broken leg. It will suppress pain symptoms like shaking hands while aiming down sights and grunting in pain. It suppresses all sneezing, coughing, and fever symptoms (blurry vision, sweating) from a cold which helps with close-range stealth. It does not effect shock like epis, and it doesn't completely remove all limps like morphine.
* Always remember: Epi-pens for unlimited sprinting, tanking more gunshots/injuries without passing out, and waking up players, morphine for moving faster with (splinted) broken legs and limps, and codeine for aiding in stealth and injured/sick combat. You cannot overdose, and in dire situations any stim is better than none.
* If you're not in combat, treating an unconscious player is as simple as waking them up and bandaging them. If you're worried for their blood stat specifically, bandage them while they're asleep and then wake them up. Remember that recovering from health and blood loss takes food, water, and warmth. Making a fire for your injured friend will help them recover faster.
* Tactical Medic - When in gunfights, if you're potentially able to administer medical care to your unconscious teammates, it can be a little hard to know what to do. First, know the difference between unconscious survivors and dead survivors. Unconned players will always be in a "high-five" or "wave" pose and grunting in pain, and if you're on a colder map their breath will be seen. Next rule is that if your teammate has collapsed outside of cover, it's not worth waking them up manually. All doors and shacks, wood or metal, are penetrable. All windows and wooden walls are also penetrable. Tents, barbed wire, and wooden planking are penetrable. The true hard cover is anything concrete or stone and the base of big pine trees.
You cannot be prone while administering stim pens or resuscitating another player, it will make you stand to crouching. Sometimes all you can do is wait for them to wake up and ask for them to crawl to you.
If the shooter doesn't double-tap them, after a few seconds they'll roll over awake. Immediately lead them to cover when they wake up. Be ready to bandage any bleeds from the damage they've taken. If you both have no bandages, cut up a piece of clothing. Judge if your current position is safe enough to stay at or if you'll need to run. If they have a limp caused by yellow, red or blinking health, administer morphine to let them move without a limp for 60 seconds. Then pop an epi-pen on them so they can run without any stamina drain for a minute. During this, find better cover. When in cover, provide food, water, and warmth. If you're still in combat and needing to keep quiet, administer codeine to anyone injured or sick to stay in stealth.
* Resuscitating from Major Bloodloss (Blinking Blood) - Epi-pens and morphine are rendered useless against bloodloss symptoms. If you ever hit yellow to red blood, discuss it with your teammates so they can have your back with preventing you hitting blinking blood. Blinking blood is the most important stat to worry about, even more than blinking health, due to the consistent unconsciousness it puts you through for around 20 or 30 minutes until your blood goes back up to red. This unconsciousness will put you in danger of many situations that have never been that dangerous before.
When on blinking blood, never drive, swim, climb ladders, or put yourself in danger of being in a bad spot while unconscious. When unconscious as a passenger in cars, trucks, or helicopters, you are fairly safe and stay in your seat. Unlike this, boats will force you out of your seat when unconscious, meaning if the boat is moving, your body will fall off the boat and into the ocean. All unconscious players in water will drown before waking up naturally. Never climb ladders as when you pass out you'll fall to your death.
* Treating Blinking Blood - Your first priority is to stop any bloodloss. Losing any more blood can mean death. Of course you can heal your blood back naturally with food, water, and warmth. But saline is the way to boost your blood regen quickly, without the hassle of bloodtypes to do blood transfusions. Saline bags can be found with or without an IV already attached.
Saline, Transfusions, IV kits - To administer anything into the bloodstream, you'll need to have an IV attached to it. IV start kits can be found in medic areas and are used to attach to either saline bags or blood bags.
Blood transfusions require both survivors to know their blood type by using a blood-test kit. With this information, referring to a real-life blood type chart will tell you if the blood is compatible. If it is not compatible, the survivor will suffer hemolytic shock and potentially die. Remember that the flu can be spread through blood if the donor was sick during the blood draw.
* Treating Fractures - Breaking your legs can be a lot simpler than you think. You don't need to be shot or get it snapped by a bear trap or land mine, you'll only need to fall an unfortunate distance like down a staircase or down a hill to break your leg and send you into unconsciousness. You cannot fracture any other bones, but your neck has an independent stat that takes damage when hit, meaning that you can break someone's neck with light attacks and instantly kill them without them even reaching chunked white health.
* Increased Shock Damage - When you have a broken leg, if you haven't instantly been knocked out you'll notice you get sent straight into the prone position. You will not be able to walk normally, as taking a few steps forward sends you into unconsciousness due to shock damage taken just by walking. Once you stand, if you hold down left control you'll be able to limp without taking shock damage.
Keep in mind zombie attacks will do an increased amount of shock, swiftly knocking you out. A light attack does 20/100 shock and heavy does 35/100 shock.
* Splints vs. Natural Healing - Naturally healing a broken leg is not advised as it can take an extremely long time (1 hour+) if you don't have enough food, water, health, and blood. The only way to walk without a splint is by limping by holding down left ctrl. To naturally heal your fracture, you'll need max health, max blood, yellow food and yellow water. Warmth will help as well as it lowers your passive energy and hydration drain and heals your health and blood stat. Once you reach these high stats, a 30 minute timer counts down til your leg heals.
A splint is crafted with just 2 short sticks (1 long stick broken in half) and either 4 rags, one full bandage, or one full duct tape. With a splint on you can't run or jump, but you can vault small obstacles like garden fences. You will no longer take shock damage when walking or jogging.
* Toxic Gas - Gas will not be something you will live through without knowing what to do. Gas poisoning is a ticking time-bomb every time you have an open wound. Without a gas mask, you will inhale a fatal amount of gas in just 15 seconds. Without a full suit of NBC gear, gas will leech through your clothes, cutting you. An NBC suit plus a gasmask with a filter will entirely protect you from the gas, unless you have an open wound caused by a zombie or players. At the very least you will need a gasmask with a filter and lots of bandages (not rags, they take too long) to keep your bleeds closed. Having a gasmask with filters and keeping your wounds closed constantly is the key to surviving toxic zones without a full suit of NBC.
* Gas Poisoning - Through direct inhalation (no gasmask/no filter) or bodily contraction (not keeping all bleeds closed, regardless of a full NBC suit and mask) you will obtain gas poisoning within seconds. Like most other sicknesses, there are 3 stages.
Stage 1
Stage 2
Stage 3 - "The Black Death"
* Contaminated Zones - There are three instances of contamination zones: static, dynamic, and player-created zones caused by gas grenades. Static areas remain gassed permanently, while dynamic zones are random-chance events that dissipate within 35 minutes. There are two types of gas grenades: impact vials and 40mm grenade launcher rounds.
Depending on the instance of gas, there are different things to keep in mind.
* Dynamic Zones - Around every 15 minutes, one random location (pool of 78 locations on Chernarus, 37 on Livonia) will be gassed. There can be 2 to 4 locations gassed at one time.
When a location is initially picked, a red flare will fall from the sky in the center of the location. After this, distant artillery sounds can be heard. After 45 seconds of grace-period, you will hear the shell drop from the plane and explode. Gas will then spread from the center out for 15 seconds before reaching the maximum distance of 120 meters. From the location being picked til the gas drop, you have about 75 seconds to recognize the signs and leave the area. Dynamic gas lasts for 35 minutes before the gas will close towards the center and dissipate. Remember that gas only spreads across one story, so being in the second story of any building will protect you if running isn’t an option.
Dynamic zones will spawn PO-X grenades on the ground in the center of the location.
* Static Zones - Static zones are much harder to traverse, though they offer extremely good weapons not found anywhere else but static gas zones. As all mobs die from toxic gas, all zombies found in static contamination zones have NBC suits and gasmasks on. They do not drop their suit parts or gasmasks, though they have an uncommon chance of dropping gasmask filters. These zombies are harder to kill than normal zombies, and the cut chance from them in combination with having to keep your wounds closed can be deadly. Stealthing through a contaminated zone is recommended, taking out zombies under stealth as much as you can.
* 40mm PO-X Grenades, PO-X Vials
40mm PO-X Grenades are ammo for the grenade launcher, found in static gas zones. When shot, it creates a 20 meter wide and 3 meter high circle of gas. It can be avoided from above or below the story it exploded on. They last for 6 minutes.
PO-X Vials are combustible glass vials of gas found in the center of a dynamic gas zone. When thrown against a surface, placed in a fireplace, shot, or otherwise ruined, it explodes and creates a smaller 10 meter wide and 3 meter high circle of gas. It can be avoided from above or below the story it exploded on. They last for 6 minutes.
Both 40mm grenades and vials are usually used during urban camping situations or otherwise unmoving players such as while they're in their base, knocked out on the ground, locked in a room, or AFK. The cloud of gas is easily avoided outdoors, but the cloud does go through walls. Shooting someone with the 40mm round will kill on impact, but the vial does no hit damage. Keep in mind to ALWAYS keep these two items in any kind of container, as when they ruin, they will explode. Never keep any form of 40mm ammo on your vest slots as they can explode when ruined. Static, dynamic, and player created gas zones do not stack debuffs or otherwise infect you with poisoning faster.
NBC Respirators and Gasmasks require a filter to work.
Filters last 8 minutes and are refillable using charcoal tablets.
Improvised filters (waterbottle + charcoal tablets) last for 5 minutes and are refillable.
Combat Gas Masks are unrefillable and can't be used with filters, lasting only for 15 minutes.
PO-X Antidotes are stim pens that remove gas poisoning from a survivor's body. They are usually found on static gas zone NBC zombies or otherwise on supply crates.
back to top
 VII. Firearms, Ammo, Armor
* Low to medium tier guns and ammo will spawn in town/village, police, farm, and hunting locations. High tier guns and ammo will be found in military areas, as well as on the military zombies that surround these locations. In this chapter, I'll tell you about the use of every single ammo, gun, and attachment.
* Every gun's damage is pulled from the ammo it's using, and damage is calculated off of bullet velocity. All low caliber guns will be lethal pointblank to the head, but even a bicycle helmet will slow the velocity of the bullet, making it possible to survive pointblank headshots.
Wallbanging is possible with any ammo if you're confident enough and many surfaces are penetrable, even metal ones. While velocity, penetration and drop-off distance is pulled from the ammo's stats, each gun has its own accuracy, recoil, rate of fire, and zeroing range. To compare and contrast all guns and ammo use WOBO's weapon tools.
* Low Caliber Ammo: Does not easily penetrate walls or armor. Best used against hares and unarmored freshies. All low calibers are common to find in low-tier towns and military bases.
* .22 LR - Easily recognized as the lowest caliber ammo in the game, when shooting another survivor multiple times they will not fall unconscious from shock like usual. Headshots are extremely effective on zombies, and headshotting a survivor point blank can kill them if they don't have a helmet on.
While it deals very low shock amounts, it will cut another survivor easily, meaning a mag dump won't be fatal, but incessantly chasing a player while they're bleeding 5x and preventing them from bandaging will be eventually fatal. This obviously won't work against armed or armored survivors. Not advisable to hunt animals with, multiple headshots are necessary. Very effective for zombie control.
* Used in 2 guns: MK II (10rnd mag) and Sporter (15rnd mag and 30rnd mag)
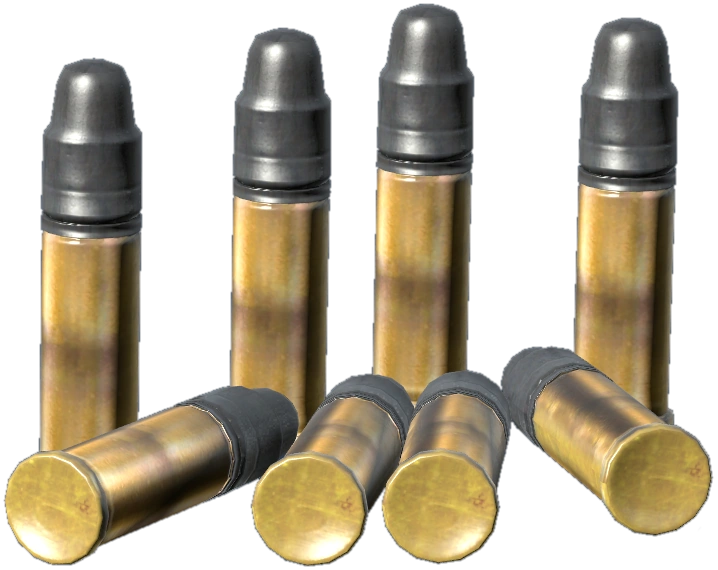
* .380 ACP "380 Auto" - Second to lowest caliber bullets, but noticeably better than .22 LR. This ammo is found map-wide and is easily upgradeable from a pistol (IJ, 12 round mag) to a submachine gun - either the RAK-37 (15 round or 25 round mag), Skorpion (12 round mag), or Bizon (40 round mag).
These are the easiest SMGs to find ammo for in low tier areas, meaning it will be your best friend to escaping freshie towns. Absolutely a necessary ammo to pick up when starting a life.
* Used in 4 guns: IJ-70 (12rnd mag), RAK-37 (15rnd or 25rnd mag), CR-61 Skorpion (12rnd mag), and Bizon (40rnd mag)
* 9x19mm - Weaker pistol caliber, nothing much of note. Used in both pistols (P1, CR-75, Mlock) and an SMG, the SG5-K.
* Used in 4 guns: P1 (8rnd mag), CR-75 (15rnd mag), Mlock-91 (15rnd mag), SG5-K (30rnd mag)
* .45 ACP - Strong pistol caliber, nothing much of note. Used in both pistols (FX-45, 1911, Mlock-91) and a SMG, the SG5-K.
* Used in 3 guns: FX-45 (15rnd mag), Kolt 1911 (7rnd mag), USG-45 (25rnd mag)
* 9x19mm - Weaker pistol caliber, nothing much of note. Used in both pistols (P1, CR-75, Mlock) and an SMG, the SG5-K.
* Used in 4 guns: P1 (8rnd mag), CR-75 (15rnd mag), Mlock-91 (15rnd mag), SG5-K (30rnd mag)
* Intermediate Caliber: Penetrates walls and/or armor. Best used against low to medium-tier geared players. Intermediate ammo is found at medium to high-tier military bases, very commonly on the military zombies around the area. Solid hunting ammo.
* .22 LR - Easily the lowest caliber bullets, when shooting another survivor multiple times they will not fall unconscious from shock like usual. Headshots are extremely effective on zombies, and headshotting a survivor point blank will kill them if they don't have a helmet on.
While it deals very low shock amounts, it will cut another survivor easily, meaning a mag dump won't be fatal, but incessantly chasing them while they're bleeding 5x to prevent them bandaging will be eventually fatal. This obviously won't work against armed or armored survivors. Not advisable to hunt with, as multiple headshots are necessary.
* Useful for: Zombie control
* Used in: MK II and Sporter
* .380 ACP - Second to lowest caliber bullets, but noticeably better than .22 LR. This ammo is found map-wide and is easily upgradeable from a pistol (IJ, 12 round mag) to a submachine gun - either the RAK-37 (15 round or 25 round mag), Skorpion (12 round mag), or Bizon (40 round mag).
These are the easiest SMGs to find ammo for in low tier areas, meaning it will be your best friend to escaping freshie towns. Absolutely a necessary ammo to pick up when starting a life.
* Used for: All purpose
* Used in: IJ-70, CR-61 Skorpion, and Bizon
* .380 ACP - Blank
Blank
* Used for: All purpose
* Used in: IJ-70, CR-61 Skorpion, and the Bizon
* .380 ACP - Blank
Blank
* Used for: All purpose
* Used in: IJ-70, CR-61 Skorpion, and the Bizon
* There are pistols, SMGs, assault rifles, hunting rifles, sniper rifles, shotguns, and even a grenade launcher and crossbow in DayZ. Automatic rifles can have multiple firing modes (semi-auto, burst, full-auto), controlled by pressing X. Double barreled guns (BK-43 and Blaze exclusively) can either fire one or both barrels using X. Bolt-action rifles and the pump shotgun will need to be racked (tap R) before it can fire again. Every single gun (minus the RAK-37) can be chambered with only 1 bullet at a time (hold R) when you don't have a mag.
* When coming across a weapon cleaning kit, always check your gear for repairs before leaving it behind. If you're in a group, carrying one weapon cleaning kit will be enough for around 3 people.
back to top
 VIII. CQC and Sniping
Close-Quarters - Your best skill to learn will be hipfiring. Easiest way to get used to it is to gun-whack (hold right-click and press F) zombies or people, knocking them backwards. If you struggle with this, try turning on the cursor (though some servers have it disabled server-wide).
cqb - hipfiring, silent drawing, muffling/cancelling sound effects of your own, wallbanging, fake-outs, hiding spots & broken angles, chances of jamming
hipfiring - When it comes to close quarter combat in DayZ you’ll find that hipfiring is your greatest ally. Practice gun-whacking zombies with a pistol and hipfiring them in their stun animation to feel more confident with this.
silent draw - I don’t know why this is still in the game, but if you drag a gun onto the ground then open the vicinity and drag it back into your hands it is completely silent.
cancelling sound cues - players will make many random noises depending on your stats. as a clarifier you cannot cancel stomach grumbles or groans of pain, but you can cancel shivering, laughing, sweating, lip smacking, sneezing and coughing by aiming down sights on your gun. staying aware of what noises you have a chance to make will help you prepare to cancel them, so always keep an eye on your stats while in close quarters combat.
Defensive vs Offensive
Defensive - When in a building, you may hear a player walking up to you. Attempting to talk to them will give you the advantage of knowing where they are, while they gain essentially no info for where you are. Close any and all doors to ensure they can’t sneak inside without a sound cue. Even if the player talks to you always assume they have a friend who may be trying to flank you while the first player distracts you. Keep a constant ear out for sound cues while trying to determine their hostility.
If they stay silent, you’ll have to use other means to figure out their position. During this time of not knowing where they are, stay away from windows and any doors as they may try to get an angle on where you are.
When in buildings, do not think you are safe. Experienced players will attempt to wallbang you, and in platformed houses you can walk around the trim and use it as a support to look straight into the home. The best cover is proning on the floor in a corner to hold an angle on the windows or doors.
Smoke grenades can help cover your position. Throwing it near windows and doors can help prevent a snipe if you need to escape. Players will all act differently, but the worse case scenario is someone who is patient and willing to wait-out for your escape.
Fake-outs are more difficult when holding an angle to prevent the push. Your goal is to lure the player into thinking you’re in an animation and defenseless. The quicker you do this the quicker the player may want to push rather than wait in the bushes.
Not giving the feeling of being very threatened by their presence will help secure this. Eating food, drinking water, unboxing ammo, and crafting something gives an audio cue that you’re in an animation, though they’re all cancellable. Hold G to put whatever you’re holding down on the ground. Putting your gun on the ground before doing this tactic will cause you to quick draw when putting it back in your hand, rather than drawing it from your back which has a 2 second animation time. For this to work you need to be prepared to quick draw when you hear them come up to you or your door, if they take the bait.
If they don’t take the bait you may be in it for the long run if they linger nearby. Listen out for their footsteps if they leave the area, and always open the door with the intent to be hard to shoot to ensure no successful ambush.
Offensive - If you see or hear a player in a building, you have many more options than if you were the player inside. Being aggressive can make your death come swift if you don’t know how geared the player inside is.
Striking up a conversation with them if they know you’re out there can help the situation, though staying stealthy will ensure a kill when they come outside if they’re still not aware you’re there.
If they’re in a two story building you can climb roofs to get a shot if they’re moving around in there. Missing your shot here though will ensure they don’t peek again, so it’s more risky than to just camp the door.
Faking grenade callouts to a real or fake teammate can maybe get the person to run out of their cover once they hear you throw something into their room. If this doesn’t make them leave, a good option is to actually throw a grenade in there the second time round with a callout as it might make them think you’re bluffing again, causing them to stay where they are. Try not to blow yourself up.
Depending on what building they’re in, lots of doors and walls are not bulletproof in DayZ, while things like barbed wire and tree hit boxes are impenetrable. Wallbanging is not a very common technique, but it’s pretty effective if aimed up correctly. If you have a full mag full-auto gun, it’s absolutely worth it to shoot through a door in an attempt at this.
gun ranging, suppression, leading your shots, true cover vs fake cover, tree climbing, breath-holding, rotating & flanking, range finding, gun sway, bugs in current patch of inaccuracy on angled surfaces
bears are aggroed by gunfire
back to top
 IX. Vehicles and Basing
* Vehicles are advanced, so your first encounter with a running car will almost always be another player driving past you or at you. Keep in mind while cars, humvees, and boats are vanilla vehicles, helicopters are apart of the DayZ Expansion mod, and bicycles are from
* Cars - Cars are manual, meaning you'll have to shift up and down through gears to avoid irreparably damaging the car's engine.
* Reading the Dash & Repairing -
* Shifting Gears -
* Lag & Fatality -
* Trucks - Trucks work the exact same as cars, though they require truck batteries to run rather than car batteries.
* Boats - You only need a spark plug and gas to run a boat. Boats will slowly decompose over time and will eventually respawn elsewhere once ruined.
* If you are really wanting to base, you're going to have to find another source, like CamCantRun. I don't like basing in this game as nomadity is what makes the game so unique feeling, meanwhile basing is more for games built like Rust. Other player's bases will block off entire sections of places you would be normally allowed to see and roam. Players will take over right next to the biggest loot spot on the whole map like Northwest Airfield on Cherno, logging on to hog all of the best loot and logging back off safely in their base. It makes the game a lot less fun, so I highly recommend playing on a server with no basing.
back to top
 X. Player Interaction and Death
* See or hear another player? As a freshie in a spawn town, other freshies are probably friendly. Lots will be friendly and greet you, some will have a murderous rage against you, you never really know what you're gonna get. The more geared a player is, the more hostile and paranoid they can be. I don't exactly recommend approaching suspicious survivors who have armor and a gun actively in their hands for this reason, though they might not be wandering around with the intent to kill everyone they see. Only one way to find out!
* In this chapter, I discuss signs of player activity, how to be friendly or hostile, using understandable comms to your teammates, stunlock advice and general combat tips. At the end of this chapter I'll discuss player death and things you can observe to determine the cause of someone else's death and around how long ago it happened.
* Before you can learn how to interact with others, you must first recognize that you're not alone. Besides straight up seeing or hearing others or their guns, here's a general guide:
* Signs there's a player nearby
- Hearing or seeing a zombie distantly scream or attack something (zombies also attack animals but it isn't very common)
- Zombies where you haven't been in the hunched aggroed pose
- Dead zombies
- Smoke coming out of a chimney or the trees (heli crashes also produce smoke)
- Hearing a car or boat engine
- Seeing moving light at night - although zombies uncommonly have working red or white bulb headlamps.
- Hearing quiet gunfire is sometimes just suppressed and not that distant from you. Always listen out for if the bullets are hitting on the ground nearby you, as some suppressed rifles are subsonic (no gun crack).
- Hearing disembodied player noises/voices like sneezing, shivering, or even hearing their body thump onto the ground if they're in bad shape. Some players have open-mic on, meaning you can hear their mic or keyboard noises up to 20m-60m. Never have open mic on for yourself.
* Not 100% signs of active player activity
- Zombies on roofs
- No loot (doesn't mean anyone is close, it just hasn't respawned, but it will on server restarts)
- No zombies - as long as you don't actively see dead zombies, it could just be the spawns being buggy, though it should raise some suspicion from you
- Stones on roads (they collect over a very long period of irl time)
- Opened doors (could be from the server restart or someone could've opened it hours ago)
- Mushrooms or apples spawning (they do spawn from a player being nearby, but it's probably you)
- A going glowstick or flare - Depending on if you're in a small, populated area versus a large, unpopulated area, this could mean someone is still nearby. But, road flares go for 20 minutes and glowsticks glow for hours - and you can't unactivate these or put them in your pocket, so lots of people leave them on the ground and leave the area. Always be wary that players may try to attract other nearby players to ambush them, especially at night.
- Items dropped on ground/stashes (items last on the ground for a few irl hours, and containers like barrels and seachests last like a week irl)
These are signs someone has been here at some point but could've moved on ages ago.
* Friendly Intentions - The most common friendly actions are the F1 wave and the friendly wiggle (Q + E). I highly recommend using VOIP when approaching anyone of any intentions. It’s the easiest way to determine their own intent by how they react to you, and may even sway a player from killing you. If someone is friendly it's always a good idea to ask to stick together, the answer is almost always a yes unless they say they're going solo or are trying to meet up with friends.
* Mic Glitches - An extremely common glitch you'll face is your microphone not working. You won't figure out it's not working until you meet someone, and even then you might not realize. If you can't hear someone speaking, let them know you can't hear them since the mic glitch is very common - lots of people won't realize their voice isn't going through. The most important part about this: Do not unplug your microphone and/or headphones in an attempt to fix this. You'll have to restart your game for DayZ to go back to using your default mic.
To see if this is happening, open your settings when you spawn in and check that your microphone is providing feedback when looking at the sound options, you should see green on the volume bar when you speak. If it isn't, you'll have to restart your game. Find your advanced microphone settings on your computer and remove all other microphone connection options leaving only your chosen mic as default. You can't change the mic the game uses while inside the game, so setting up the right mic to be default for DayZ is important.
* Keeping your Teammates Safe:
Against Zombies - You will eventually hit someone while attacking the same zombie, so heed my warning: always anticipate if someone will walk infront of you and flick your mouse away from them. The last place you want to accidentally hit is your friend's head/face. Like I mentioned in Advanced Health, you can easily crit a survivor's neck and kill them on impact no matter if they're full health or flashing. Though fists can be deadly, the heavier the weapon, the more deadly your hit can be. Whatever you're looking at during the animation is the hitbox your attack will land on, so turning away at the very last second ensures you won't hit someone.
Always debate if getting a melee in on the zombie is necessary to your friend's survival. If it's just one and they're on white health, they can handle it. If your friend is on low health, keep a close eye on them as they will walk very slowly the more hurt they are. If one zombie is a threat to their life, always block the zombie from hitting them. Otherwise, your friend should be constantly walking backwards while blocking to ensure that they don't take a hit instead of attempting to attack the zombie themself.
Against "Hordes" - Always run away from each other in horde situations and try to find somewhere to climb up on. Staying away from eachother is important as when one of you passes out or dies, the zombies that were aggroed on you will swap to the next closest person if they're in visual or audible range. The more room the each of you have to find something to climb, the better. If you've found a safe spot, let your friend know how you got there over voicechat (remember to use shout - 3 bars - so they can hear you from far away).
Never corner yourself, just one or two zombies can block your way and they will not move at all, meaning a situation where you're trapped is a dire one. One or two can be stunned backwards using heavy attacks or a normal gunwhack. Over 2 zombies, you can shoot them or beg for someone to help you, but at the end of the day all you can do is block their attacks when you're truly trapped. If you're not blocking, all of the zombies will hit you in unison sending you into instant unconsciousness or death. If you can get away with going uncon, the zombies will wander away. Remain where you woke up from and bandage your cuts. If you're badly injured with a limp (low yellow to flashing), it'll be in your favor to stay right on the ground and try not to aggro any zombies. If you don't have a limp (max white to high yellow), run free.
Against Yourself - Besides flicking your mouse away during melee attacks to avoid hitting your friends, always make it clear when you're going to shoot. Doing this encourages your teammates to do the same with you, which can save your life or otherwise prevent confusion or panic of who is shooting at what. Along with this, call out what target you're on if there's more than one target during medium to long distance encounters.
Also, keeping a constant eye on what your friends are wearing will help prevent friendly fire. Always announce when you've changed clothing, even if it's a small change. You can't expect others to constantly remember your full outfit, it's likely they're only really remembering your hat or shirt for example. Armbands can help in larger groups, though be aware bright armbands need to be avoided due to visibility through foliage and sometimes people can sneak into your group by wearing the armband (only if your group is very large, of course). There are multiple ways of sneaking into a large group, like assassinating someone and changing into their clothing or finding leftover armbands. While we're on this topic, red armbands are universally seen as a hostile thing to wear, so wear any other color.
Against Others - When in combat with close-range hostiles, always insist on whispering (lowest distance VOIP) to each other to help secure your comms. During indoor combat, insist on laying prone away from windows and keep an ear/eye out of grenades being thrown in. When in outdoor combat, never use bushes or tall grass as cover as they do not get rendered when far away, meaning you'll stick out like a sore thumb. Instead, use trees, (especially pine trees, hiding at the base of them renders you almost invisible) rocks, buildings, etc.
* Using Comms with Teammates:
Contact - When you see a player it can be a little difficult to describe what you need to to your teammates. Keep in mind to avoid calling both infected and survivors "guys" like "there's a guy over there" - you can do what you want, but it can be conflicting comms.
Some descriptors to keep in mind are: (Where) you're seeing them - about how far and what direction they are from you - like 20 meters front/very close in front of us? Next, (Which direction are they facing)? If they're running, are they going left to right, right to left, towards or away? (What are they doing) - standing, crouching, laying down, etc.? (What are they wearing) - you can use colors instead of clothing names. (What are they holding?) Nothing? A gun or an item?
Building Names - While you can just use the colors of a house, some building types have very similar design overlaps that may cause confusion.
Town Houses -
Cabins -
Civilian Buildings -
Military and Industrial Buildings -
* Radios & Friends - If you've both got radios with batteries it's smart to decide on a channel to radio to each other with if you get split up or die. Radios can only be turned on if it's on your backpack strap slot or directly in your hand. Placing radios in your inventory turns it off. Remember the radio is constantly listening to any VOIP and even proximity text chat from your end when it's powered and turned on. When speaking to the radio, always keep your voice on whisper to avoid unwanted eavesdropping by players that could be near you. Never use exposing comms over the radio to your teammate as they might not be the only one listening.
* Radio Spying - Radios work in a range of 5km, meaning you won't hear the absolute entirety of Cherno speaking through it. Unlike Cherno, Namalsk's island is covered entirely by the radio, meaning someone underground in A3 can easily speak to someone up in the north. While scanning through channels, spying on others is easy as long as you never speak or type in chat while having the radio turned on. This is easily done by a solo-player or a group that knows not to speak or type when the radio is on. You can easily track someone who is using clear comms on locations, so keep in mind not to say anything exposing through comms when you're using the radio yourself. If a radio is left turned on and placed on the ground (even on backpacks), another person listening to that frequency within 5km can hear VOIP and see any typed messages by players near the radio, meaning it can be a secret recon tool, being especially helpful on small, densely-populated maps in frequented areas. Radios always make a quiet static noise when powered and turned on.
Hostile Interactions - It might be hard to understand someone's intention just by their voice, but you should always assume someone is hostile before they're friendly. If you leave a survivor alone and don't see what they're up to, chances are they'll see you nearby at some point and ambush you. Listen closely for gun drawing sound effects and unpinning grenade noises through walls when you’re near someone. If they’re right in front of you, keep an eye on their hands. If they have a gun out, ask them to put it away. Players with guns in their hands don’t immediately mean they’re not friendly, but hip firing in this game is incredibly fast. Keep in mind that players know freshies have nothing to lose and everything to gain, so as a freshie, geared players will be very wary of you. At the end of the day, players that feel the need to kill you will do it no matter how much of a true threat you are to them.
Offensive Items - When looting, make some room for items you can use against other players if threatened, like frag grenades, rope, duct tape, handcuffs, metal wire, barbed wire, and burlap sacks. Tying up survivors that you've knocked out and having a conversation with them can let you gain a friend, or let you know you should kill them. They may also shoot you as soon as you let them go even if they're nice, so take their guns from them as a precaution and give it back when you've established trust. Grenades are self-expanatory, but should be used in extreme caution since it's very easy to blow yourself up. Burlap sacks can be put on the heads of tied-up players, and have no real use other than this (though, cutting it up into burlap strips is an important crafting material).
* Picking Up Guns & Ammo - Finding a gun with matching ammo will be an important goal in a life. Being able to defend yourself is not an easy task against geared players. Pick up any ammo and mags you see as they’ll come in handy later. Even if you don’t end up using a gun with the ammo you have, you could encounter a potential teammate that takes a different ammo. You're also taking it away from other players, keeping others ammo-deficit, which is very good for you. Always throw unwanted guns and ammo into bushes to keep it away from others.
* Freshie Stunlocking - Knowing you have a chance to defend yourself even while fresh and unarmed is an important thing to know. When you're a freshie, your greatest potential is to stunlock players with your maxed stamina. By chaining 3 or 4 heavy attacks + spamming light attacks with your fists (or better yet with some brass knuckles) on another player you can stunlock them into unconsciousness or even death. Starting initially with a sprinting heavy attack will aid you greatly. As you run out of stamina and can no longer heavy attack, throwing in as many light attacks as you can while they're animation locked will aid you in knocking them out. It has to be done in quick succession, shock value goes back up in just a few seconds. Remember after doing this you'll be left with no stamina, so as soon as the player isn't stunlocked, they're going to run away and could potentially pull a gun. Always aim upwards for their head when spamming attacks to max your shock damage. Keep in mind that armed survivors will sometimes be able to get shots in during this, as well as stunlock you back using gun whacks if you're close enough to them and they aren't stunlocked. Despite this it's possible to stunlock armed players, though sometimes you might have to dodge and bait gunshots from them. Keep in mind survivors armed with shotguns are the most deadly when it comes to countering a stunlock.
* Stamina in Combat -The heaviest starting clothing you can wear are the firefighter pants & jacket, which are best insulation, 7kg, heavy cut resistance and 24 slots inventory - a very good clothing set, aiding in toxic zones (with at least a gasmask and filters). And a heavy, but absolutely necessary, item to carry are full pots of water. Being heavy is not bad as long as you have a plan for a hostile encounter and use your stam wisely. Once you're geared, jogging will become your method of travel. You'll use your limited stamina to help get to cover, dodging melees or shots, or stunlocking a player with a running attack. You can be so heavy you have no stamina at all, and more than halfway gone you'll lose the privilege of climbing on things or jumping completely. This is why it's a good idea to organize your heaviest items into your backpack, letting you drop your weight and giving you your stamina back in a dangerous situation. If you're sniping, dropping your bag will let you hold your breath for longer. Keep in mind wet clothing weigh much heavier than dry clothing, meaning you will need to wring it out once wet, though keep in mind that lots of thick clothing aren't wringable, as well as some hats.
* Stunlock Distancing - If you're chasing someone, letting them run away longer than you will help. Save your stamina to catch up to them once they've hit zero stamina. Don't use heavy weapons when running at someone from too far away as heavy weapons take a significantly larger amount of stamina than your fists, as well as the animation being much longer. Heavy weapons are best used indoors in a very close range on unaware survivors, as the running heavy attack has an insane range - as long as you're facing the right direction to them and were sprinting into the attack, you can absolutely hit people from around corners and even straight through windows and some walls (given they're very close).
If someone else is running at you with the intent to heavy attack you, balance your distance from them and your stamina left. You're going to need to save it so you can bolt away from them when they try to hit you. If they've already closed the distance without you being able to get away, you're already at their mercy. You cannot block heavy attacks at all, but you can try to stunlock them back especially if they're using a large melee weapon, since the heavy swinging animation is longer than a heavy punching attack. It's impossible to get out of a good stunlock, meaning the only thing you can do is run away and/or try to stunlock them back. The running
* Gun Whacking - Pressing F while you're hipfiring your gun (holding gun in hand + holding right click) will make you melee with your gun, and it's an insanely powerful melee attack since hipfiring at someone/something in an animation lock is very easy to do. Players, zombies, and even wolves will be stunned backwards for a second. The range is roughly around 4 meters, so you'll need to be face-to-face with what you're attacking. It's a skill to know when having access to a gun - the only downside is that it won't do anything against an armed opponent, only something that's trying to melee you.
Stunlocking a player with their gun out is possible but incredibly risky as they not only have the chance to gun-whack you (which counters your animation since it's so fast) but they will be able to shoot you inbetween your punching for a quick second before being stunned again, meaning you'll have to try to hit someone from the side or behind to be truly safe. If you're carrying a gun and someone tries to stunlock you, gun-whack them if possible and aim for the head. You can absolutely chain gun-whacks until a KO, it's an extremely fast attack and barely takes any stamina per whack.
* Death comes to us all. After you understand how to keep yourself healthy and fed, your next curve will be combat. Be it hungry predators or hostile survivors, each time you get further in and ultimately meet your end, there will be many productive lives that will help you grasp the game more and more.
* Corpse Decomp Stages & Identifying Death Causes - Now that you’ve heard that, let me explain some signs you need to keep in mind when you find a dead body. If a body has been cut up, it’s impossible to tell any of these signs. If you are wanting to hide a body you will find many advantages to cutting them up.
If you see a dead body and you don’t hear flies, it’s happened less than 7 minutes ago. The flies sound effect starts exactly at the 7 min mark, and then the body will become more decomposed at the 15 min mark. It’s safe to say that by the time a body is around 20 mins old, the person who might be responsible for their death is not around, though piles and piles of corpses absolutely means someone is camping the area. Even if it seems quiet, especially in Outskirts or Jalo, the types of players that camp areas are getting away with it for a reason. In this situation you have to assume they're lining up the shot from somewhere.
* DECOMP stages
If the corpse has been completely looted and stripped and the flies haven’t even set in yet, there is a player nearby. Either they were robbed before death of all their clothes and items, or someone has come by and picked them within the last 7 minutes.
If it hasn’t been looted, use context clues to figure out if this was a victim of someone else or themselves. Knives, sharp melees, or guns on the floor next to their hand can indicate that they’ve killed themselves or they died while holding that item. Suicide poses are strikingly different than homicide though, so the pose will be how you determine the difference.
* POSES
* There are 4 rules to identifying the cause of death of a player:
1. Identify the death pose of the body. Suicide, getting shot, and dying of natural causes have different poses entirely. Where the feet are pointing is where they were killed from, or if it’s natural causes it’s what direction they were facing at the time of death. If the corpse is generally mangled with broken limbs, that survivor fell from a high enough height to die on impact.
2. Look at the condition of their clothes. If the headgear, eyewear or face slot is ruined, they were probably shot in the head or hit on the head. If their armor and shirt is ruined, they were probably shot or beaten by zombies. If their boots are ruined, they probably stepped on a landmine or a bear trap. If all of the conditions are all damaged, badly damaged, or pristine either they died of natural causes or could've been blown up by a grenade, as grenades for some reason do absolutely no damage to clothing.
3. The location and contextual positioning of the corpse. I don't know how to elaborate on this one because it varies widely. An example: If they're in a building next to a window with their feet and body pointing towards the window, chances are they were shot from out that window!
4. Check what fell out of their hands. What they were holding at the time of death can be a huge context clue.
* 1, 2, 3, 4 INFOGRAPHIC
* There’s no true way of knowing what happened to someone, but knowing what the condition of the body means can let you know when to leave an area sooner than later.
back to top
 * 2012 Arma 2 DayZ Mod and Lore
You play as one of the many survivors that have immunity towards the infected. Remnants of the main military forces that swept through the area remain to this day. It's unknown exactly how long after the outbreak the game takes place in, but military force remains to keep an eye on the attempts to kill all of the infected, shown by the periodic gas bombs dropped on random towns that kill anything they touch including people, animals, and the infected. Western forces are shown to have interfered due to the amount of Western guns, ammo, and clothing.
back to top
 * After You Play...
holiday events, map specific tips, map recommendations, namalsk & banov suit, dinosaur servers, etc
Gravity & Physics - Don't stand too close to others while descending on a hill. Stepping on other survivor's heads will launch you. Don't ever jump while descending
Livonia Bunker -
back to top
 Old Menu Theme - "Innocence Died Screaming" by Nick Fox